Requirements Documents
You can open documents using the Project pane, see Open and Close Documents.
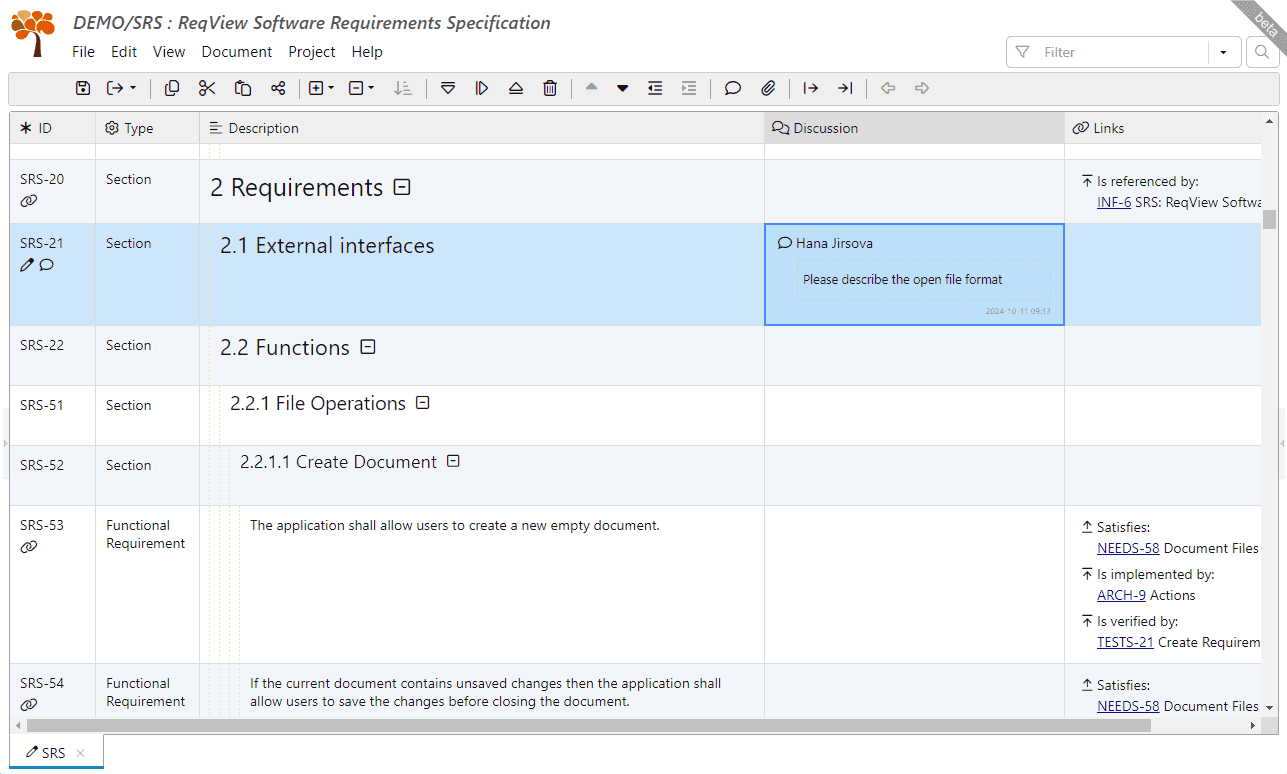
The content of the current document is displayed in a table view placed in the central application pane. The table highlights the tree structure of the document and shows information about requirements in the following predefined columns:
- ID,
- Description,
- Links, and
- Discussion.
You can configure the table to display additional custom attribute columns or template columns.
Note: You can choose to display documents either using the Legacy Grid Component (enabled by default) or the New Grid Component introduced in ReqView v2.20. The new grid component offers several new features, such as freezing columns and context menus, and is still in Beta. To enable the new grid component, click Edit, select Preferences, check Use new grid component (Beta) in the View section of the Preferences dialog, and finally reopen all documents. Usage of the new grid component is assumed in the documentation below.
To display or hide table columns, click View or right-click on a column header, select Columns and choose visible columns from the popup. To reorder or resize a column, drag & drop the column header.
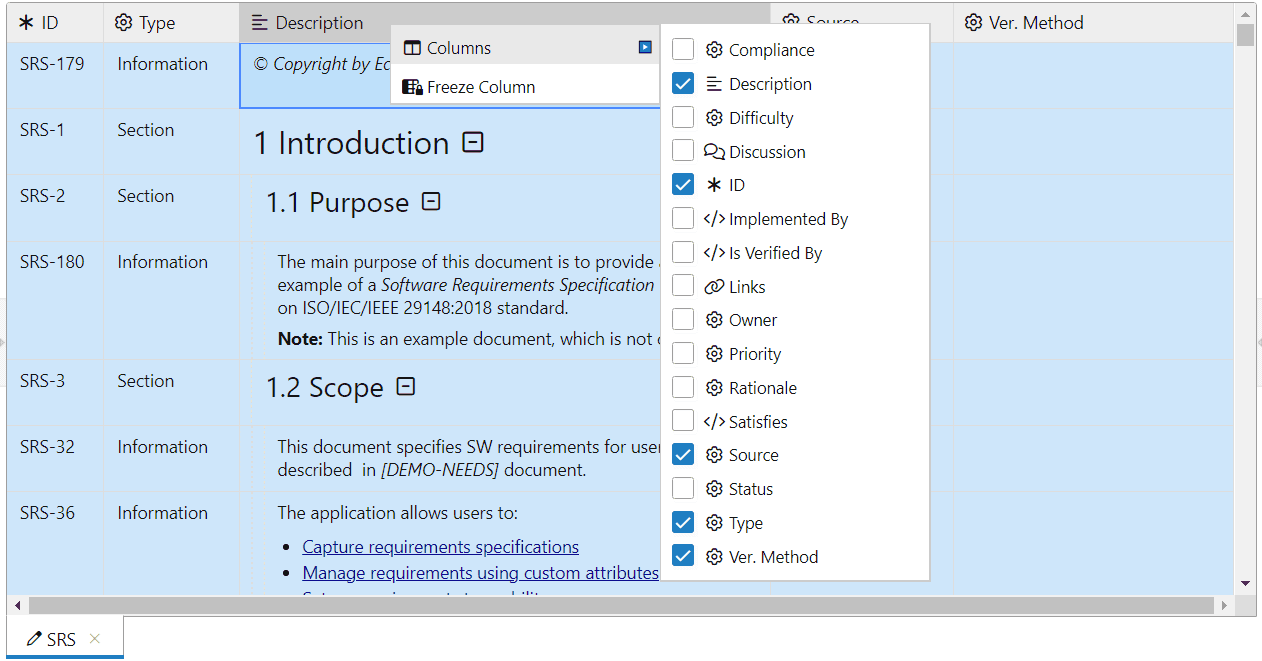
You can freeze the position of a column on the left to keep it visible when scrolling the table view horizontally. To freeze a column position, right click on the column header and select Freeze Column. You can freeze multiple columns by repeating this step. To unfreeze a column, right click on the column header and select Unfreeze Column.
The current table layout given by order, widths, and display status of all table columns is persistently saved and restored after each application restart, see Table Views for more information.
Document Sections
You can structure requirements into document sections with a tree hierarchy. Document sections containing children are numbered automatically similarly as in MS Word. For instance, a section at the first level gets number "1" and its sub-section at the second level gets number "1.1". See Move Objects for more information on how to organize document objects into sections.
You can display the table of contents of the current document in the Document pane. To navigate to a given document section in the table view just click on the section in the Document pane. To toggle the Document pane, click View, mouseover Left Panes, and select Document Pane. Or press CtrlAltT. The Document pane displays all document objects with a section number by default. To hide document objects without children in the pane, click Edit, select Preferences, and tick Show only sections in Document pane.
To collapse or expand a document section in the table view, click the / icons on the right of the section name or select the section and press Space. To collapse document sections by level, click View and select Collapse Sections menu, or click icon on the toolbar. To expand document sections by level, click View and select Expand Sections menu, or click the icon on the toolbar.
Document objects without children are assigned a section number automatically by default if they have the heading attribute set. To enforce section numbering for a selected document object without a section number (i.e., without children and heading), click Edit, select Set Section Numbering, and click Force Numbering. Note that there is no difference in visual appearance between the default and forced section numbering. To enable the default section numbering for the selected document object, click Edit, select Set Section Numbering, and click Default Numbering.
ID Column
The ID column displays the unique ID of each document object. Document object IDs are prefixed by the document ID by default, e.g. “NEEDS-123”.
To show only numeric document object IDs, click Edit, select Preferences, and uncheck Show document ID prefix in ID column.
The column can also display the following status icons:
| Icon | Description | Appears When |
|---|---|---|
| Unsaved change | The object was changed since the last time the current document was opened and has not yet been saved to a file. | |
| Comment | The object is commented on. | |
| Attachment | The object has at least one attachment. | |
| Link | The object is linked with another requirement or object. | |
| Deleted | The object is marked as deleted, but not yet purged (completely removed from the document). The object can be undeleted. | |
| Cut | The object is cut in the clipboard and will be moved on a paste operation. | |
| Copied | The object is copied in the clipboard and will be copied on a paste operation. |
Description Column
You can show the Description column displaying the document section number, values of heading and text attributes, and file attachments. See Edit Description for more information how to edit section headings or text descriptions. See Attach Files for more information how to attach files.
There are no restrictions on the attachment file type, however, the preview is displayed only for image (PNG, JPEG, GIF, BMP, SVG, WebP and AVIF) and MathML (*.mml) files:
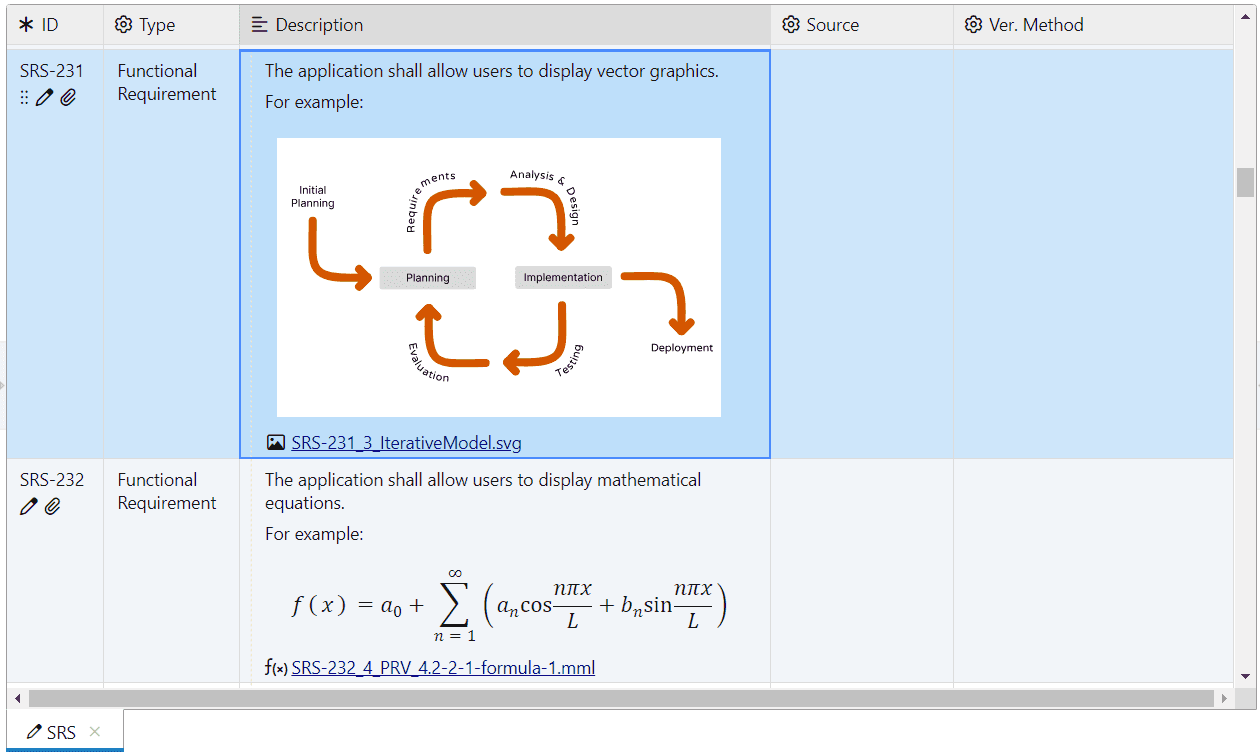
Note: Preview of SVG images larger than 10MB is not displayed in the table view to prevent degradation of application performance.
MathML attachments are displayed using the Latin Modern Math font (widely used in LaTeX math typesetting) if it is installed. Otherwise, the Cambria Math font is used on Windows, the STIX Two Math font is used on macOS, and DejaVu Math TeX Gyre font is used on Linux. For more information about math fonts and installation instructions, see Fonts for MathML.
To preview an attachment, click on its ID displayed in the Description column. Image and MathML attachments are displayed in the Image Preview dialog, other types of attachments are opened as read-only in the default application set by the operating system.
You can also right-click on an attachment and select the appropriate action from the context menu:
- Show Image / Hide Image or Show MathML / Hide MathML — show / hide the image or MathML preview in the table view.
- View in Dialog — preview the image or MathML in the Image Preview dialog.
- View in External Application — preview a read-only temporary copy of the attachment file in the default application set by the operating system.
- Save As — save a copy of the attachment file to a selected folder in ReqView native application, or to the browser download folder in ReqView web application.
To show / hide all image attachments in a document, click View, mouseover Image Attachments, and select Show All Images / Hide All Images. To show images after opening a document automatically, click Edit, select Preferences, and tick Show images and MathML.
Tip: Hiding image attachments in large documents or documents with a large number of attachments can significantly improve application performance.
Links Column
You can show the Links column displaying outgoing and incoming links grouped by relationship type. For more information, see Display Links.
Discussion Column
You can show the Discussion column displaying requirement comments. For more information see Control Project Changes.
Attribute Columns
You can show a separate attribute column for each custom attribute defined in the current document to display or edit its value for more document objects. For more information, see Edit Custom Attributes.
Template Columns
You can customize the table view with template columns displaying calculated expressions, attribute values, or traceability information about linked objects. Template columns are persisted in the Table Views in your Project File or Project Folder, see the next section.
Calculated Columns
Calculated columns display a text output using template expressions, template helpers and attribute values.
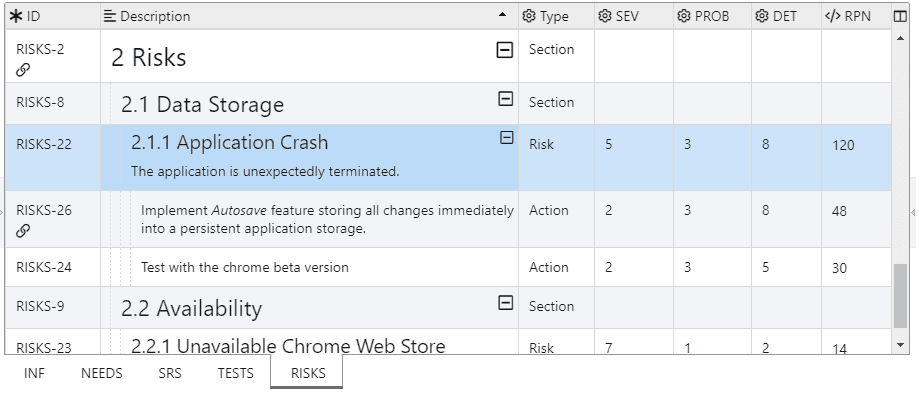
To add a new calculated template column, click Document, mouseover Add Template Column and select Custom Template. In the Template Column dialog, enter a column label displayed in the table header and a template code. The dialog instantly displays a preview of the template column for the currently selected document object. Press OK to add the template column to the current table view.
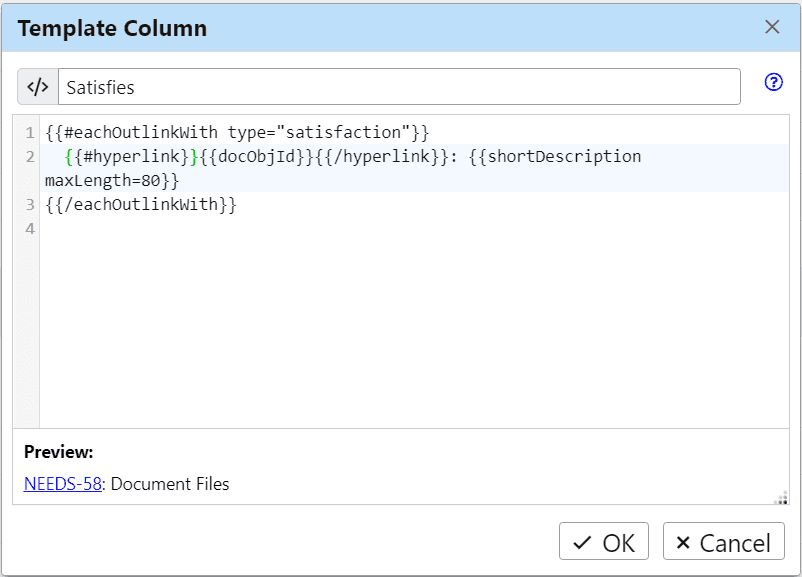
For more information on how to write template code, see section Export Using Custom Templates. Note that template columns are rendered using document object context, therefore you can directly use document object attributes, for instance, {{id}}, {{heading}}, or {{{text}}}.
Example: In the RISKS document of the DEMO Project, create the RPN column calculating the Risk Priority Number as a product of custom attributes severity, probability, and determinability for each Risk or Action object using the following template code:
Attributes Summary Columns
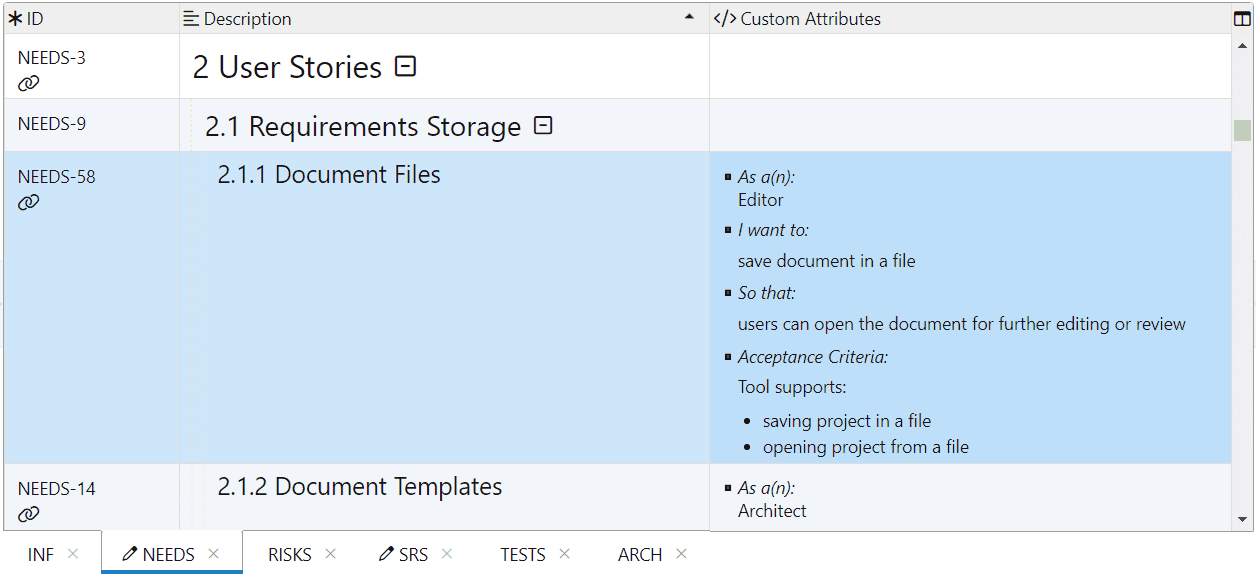
Attributes summary columns display values set for the selected custom attributes. To add a new attributes summary column, click Document, mouseover Add Template Column, click Attributes Column and finally select:
- All Attributes — to create the Custom Attributes column displaying all custom attributes in the current document,
- Visible Attributes — to create an attributes summary column displaying all visible attributes in the current view, or
- Hidden Attributes — to create an attributes summary column displaying all hidden attributes in the current view.
You can edit an attributes summary column if you need to adjust its output.
Example: In the NEEDS document of the DEMO Project, create the Custom Attributes column summarizing values of custom attributes asAn, iWant, soThat, and acceptanceCriteria.
Traceability Columns
Traceability columns display linked objects across one or more traceability levels in live Requirements Traceability Matrix (RTM) views. You can create new traceability columns using the Traceability Column Wizard easily:
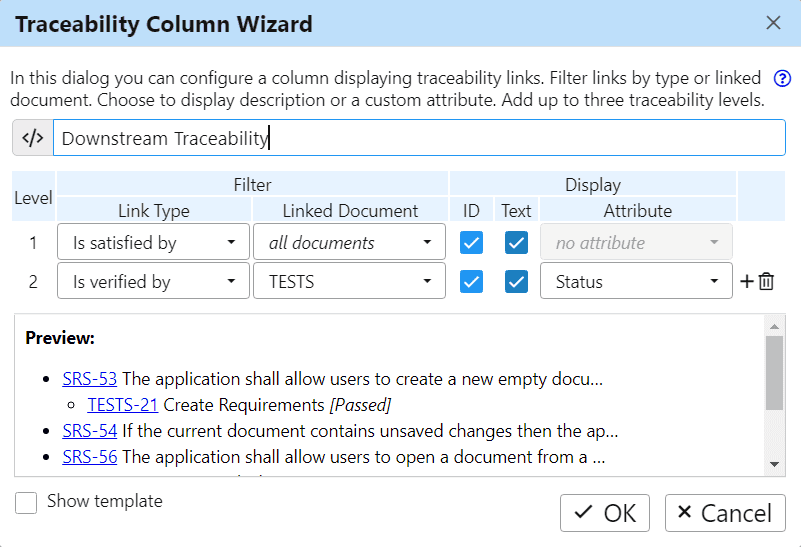
To open the wizard, click Document, mouseover Add Template Column, and select Traceability Wizard. You can edit a template column if you need to adjust its output.
Example: In the NEEDS document of the DEMO Project, create the Downstream Traceability column displaying traceability coverage of user needs in the NEEDS document by linked SW requirements in the SRS document and test cases in the TESTS document using the following template code:
<p>◂ <em>:</em> <br> ◂ <em>:</em> <br> ⚠ Missing verification links </p> <p>⚠ Missing satisfaction links</p>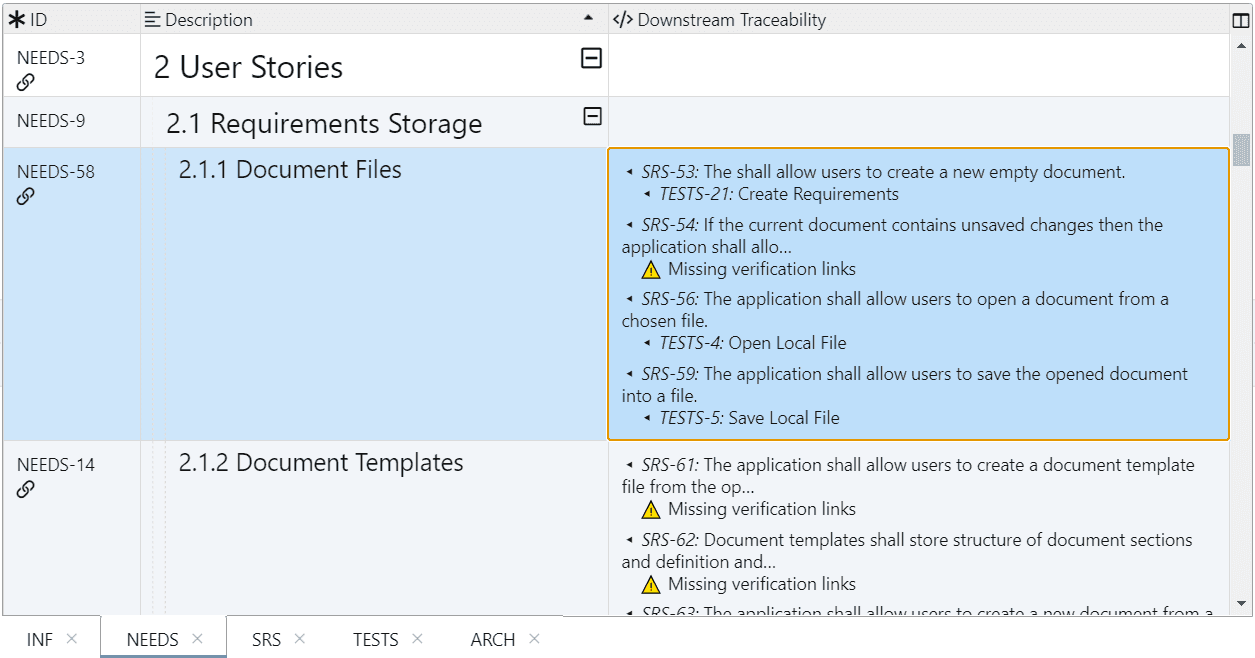
Note: Changed object attributes are automatically propagated to displayed traceability columns for directly linked objects only. For instance, if you change the heading of TESTS-21 then the traceability column Is Verified By for SW requirement SRS-53 displays the new heading value. However, the traceability column Downstream Traceability for user story NEEDS-58 still displays the old heading. Select the NEEDS document and press F5 to refresh the view and see the change of TESTS-21.
Edit Template Columns
To edit or delete an existing template column, right-click on the column header and select Edit Template Column or Delete Template Column respectively. Then, edit the template code in the Template Column dialog, see Calculated Columns.
Table Views
The table layout stores information about order, widths, and visibility of table columns. It is persistently saved and restored after each application restart.
You can save the table layout, sort criteria and filter condition for any document as a named table view persisted in the Project File or Project Folder. This allows you to configure table views for specific tasks and reuse them by all team members. For instance, each requirements document can have separate table views for capturing requirements, linking with upstream requirements or tests, traceability analysis, exporting, or printing.
Example: The SRS document in the Demo Project storing SW requirements defines the following table views:
- 1. Primary — is the default view used when the document is opened and gives a brief overview of the document. It displays columns ID, Description, Rationale, and Status.
- 2. Capture — is used for capturing SW requirements. It displays columns ID, Type, Description, Rationale, and Source.
- 3. Review — is used for reviewing SW requirements. It displays columns ID, Description, Rationale, and Discussion.
- 4. Traceability — is used for requirements traceability analysis by a traceability matrix. It displays columns ID, Type, Satisfies, Description, Is Verified By, and Is Implemented By.
- 5. Export — is used for exporting SW requirements into MS Word. It displays columns ID and Description.
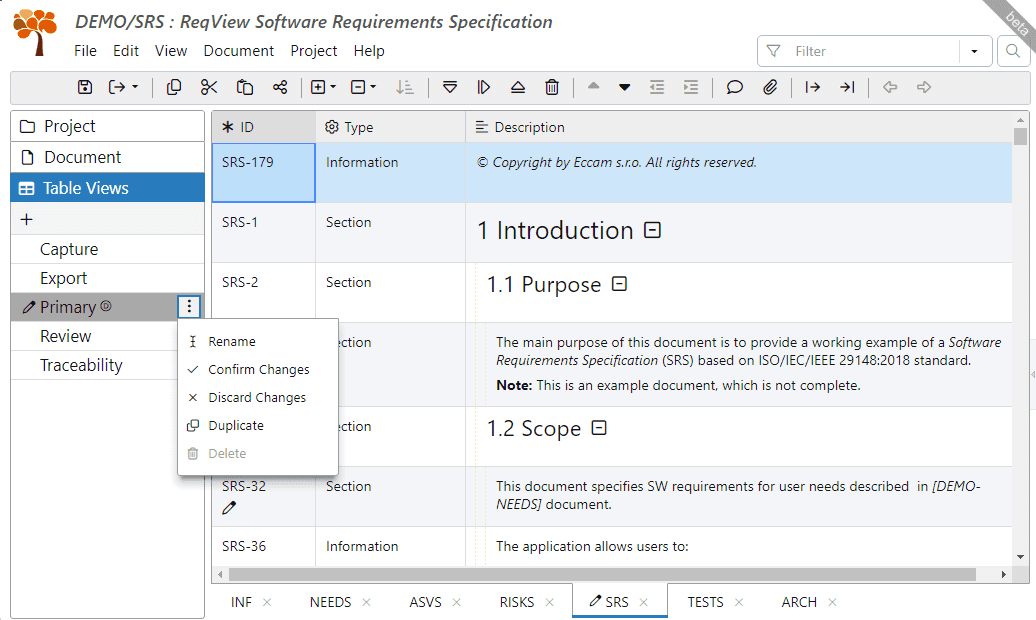
You can manage table views for the current document in the Table Views pane. To toggle it, click View, mouseover Left Panes, and select Table Views Pane. Or press CtrlAltV.
To create a new table view, click icon in the toolbar of the Table Views pane. In the Create Table View dialog, enter a name of the new table view. The new table view contains the ID and Description columns by default. Check Duplicate current document view option to preserve the current table layout, filter and sort.
To duplicate an existing table view, click on the right of a chosen table view name and select Duplicate from the menu.
To switch between table views, click on the selected table view name.
Local changes of table layout, filter or sort of the current table view are restored when the application is restarted. To propagate local changes to the shared table view, click on the right of a chosen table view name and select Confirm Changes from the menu. To restore a shared table view with discarding local changes, select Discard Changes from the menu.
To use a table view automatically when a document is open, click on the right of a chosen table view name and select Set as Default from the menu. The default view has the icon displayed next to its name.
To edit the name of a table view, click on the right of a chosen table view name, select Rename from the menu, and finally, enter a new name in the Rename Table View dialog.
To delete a table view, click on the right of a chosen table view name and select Delete from the menu. The default view cannot be deleted.
Project Windows
You can improve your review and edit workflow using multiple project windows:
- View different documents from the same project at the same time.
- View linked requirements in other project windows.
- Edit requirements in multiple project windows.
- Copy & paste requirements between project windows.
- Create links between project windows.
- Compare the project with a baseline in another window.
To edit the current project in another application window, click View and select New Window. Windows showing the same project are identified by an index in square brackets in the window title. Move the new window to another display or place the project windows side-by-side:
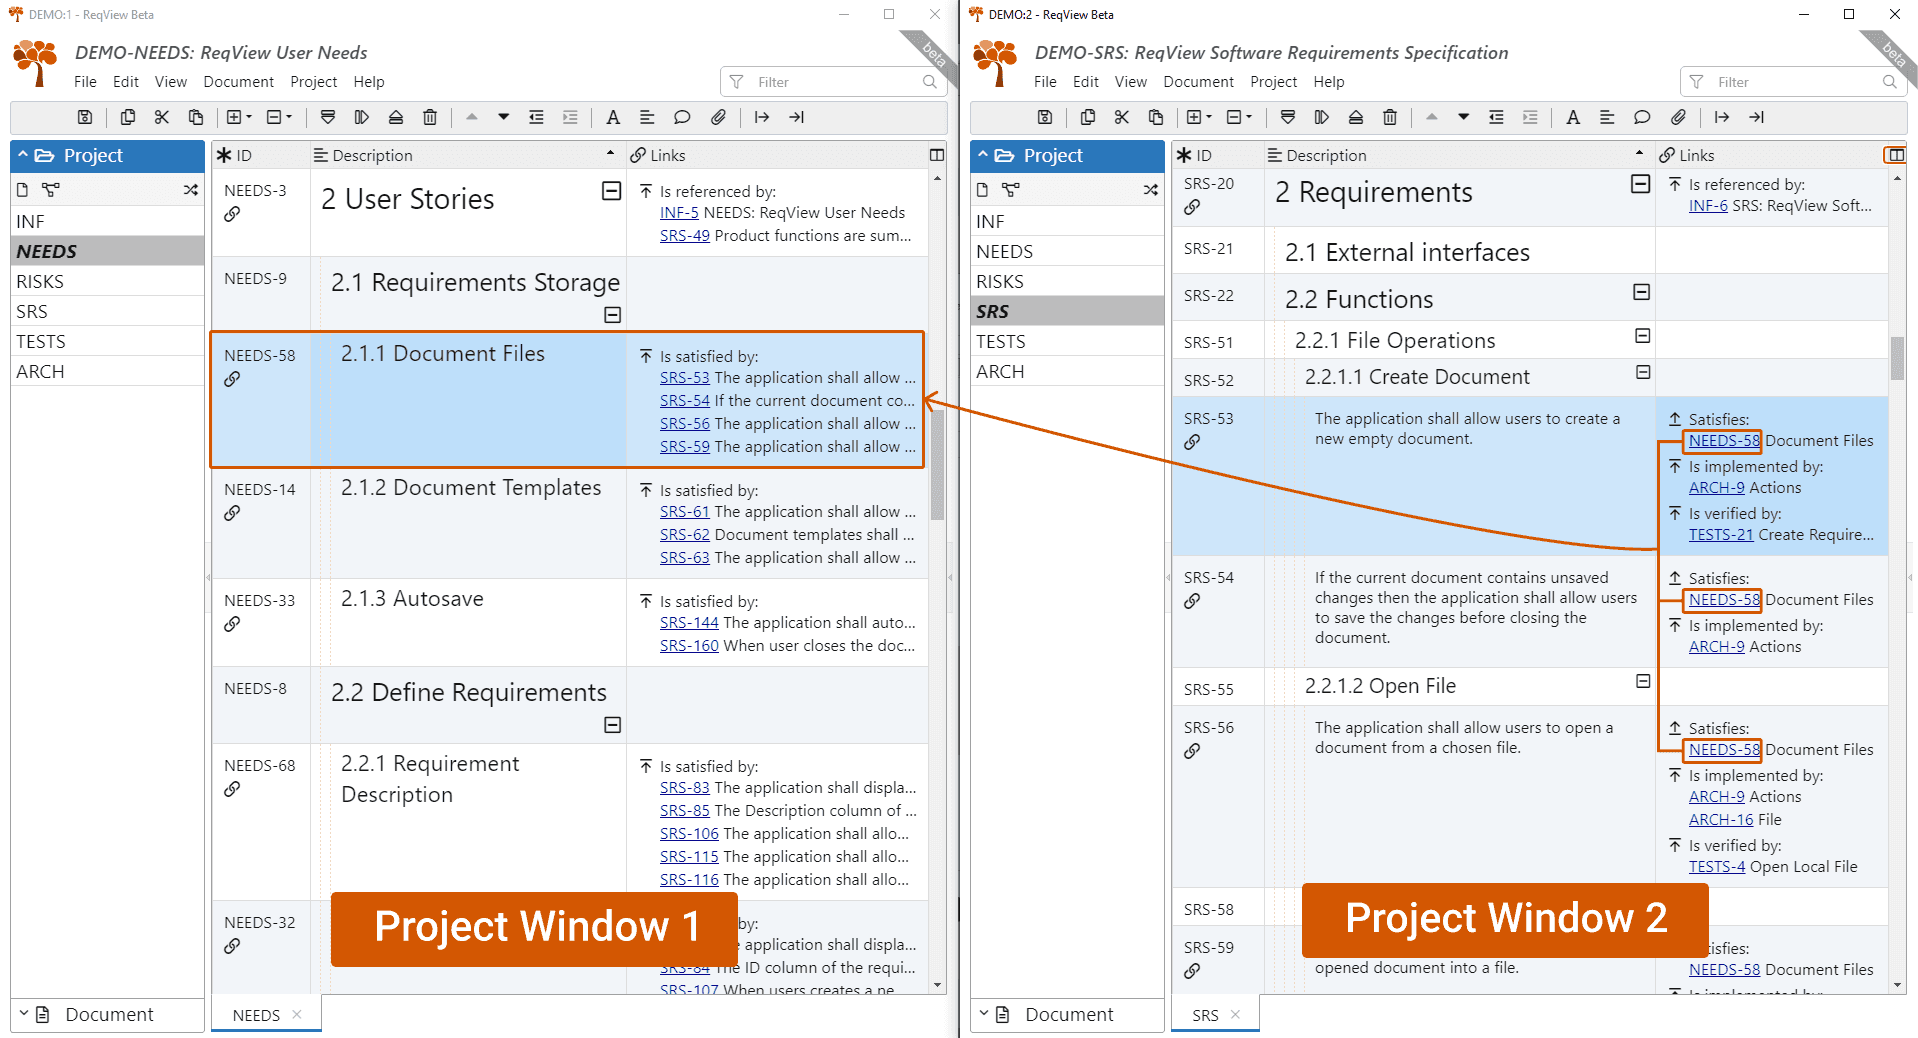
Changes done in any project window are propagated to other project windows automatically. However, some operations block other project windows to ensure data consistency. Saving can be done in any project window.
Closing a project opened in multiple windows will close it in all windows and will leave only the current window open.
Share URL Links
You can share the URL link to a ReqView requirement by email or company chat, reference it in a document or a ticket, etc. Or, paste the URL link into the ReqView rich text editor to link requirements between ReqView projects.
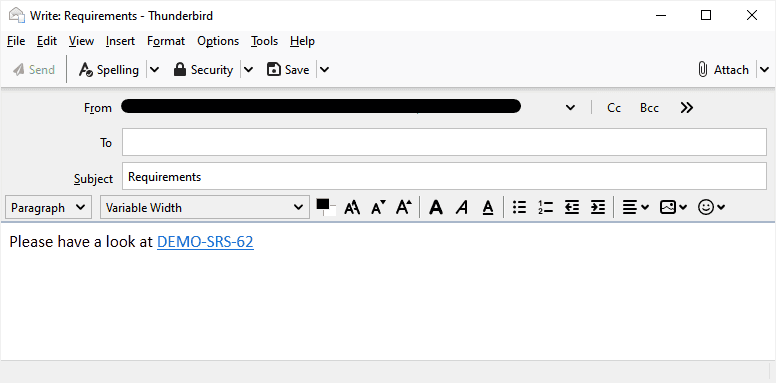
To copy the URL of the selected document object into the clipboard, click Edit or right-click the document object and then select Copy Object URL. You can also click the button in the toolbar or press CtrlK.
You can paste the URL link to a chosen application. If the application supports pasting of HTML content (MS Word, web browser, most email clients, etc.) then the pasted URL link will show the document object ID with a hyperlink. Otherwise, (like in plain text editors) it will show the URL text (e.g. reqview:open?projectId=DEMO#SRS-62).
The protocol (scheme) of the generated URLs is always reqview:. ReqView URL links are not pointing to websites on the internet but to project data stored by the ReqView application.
Note: Do not add http:// or https:// in front of ReqView URL links, as that would make them not work.
You can click on a pasted URL link to navigate to the related document object in the ReqView application for Windows, Linux, or Mac. However, you need to enable the OS association with reqview: protocol by ReqView application first. Click Edit, select Preferences, and check Register file and protocol handlers option before using this feature. When this option is enabled, click on a ReqView URL link to start the ReqView application or focus one of its windows if it is already running.
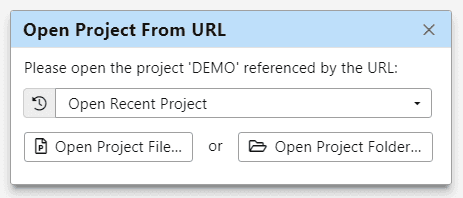
If the referenced project is open in multiple project windows then the window that has the referenced document open is focused. Otherwise, the document is opened in a new tab in one of the windows. If the referenced project is not loaded in any ReqView window, choose the referenced project using the Open Project From URL dialog:
Tip: Paste URL Links into ReqView rich text editor of an xhtml attribute to reference requirements from another ReqView project. See Traceability Between Projects.
Note: URL links cannot be handled by the ReqView web application.
Copy to Other Applications
To copy the selected text from the ReqView UI to the system clipboard, press CtrlC:

You can also select one or more document objects and copy to the system clipboard a table containing information in the visible columns. To copy selected document objects, click Edit or right-click the document object and select Copy. You can also click the button in the toolbar or press CtrlC.
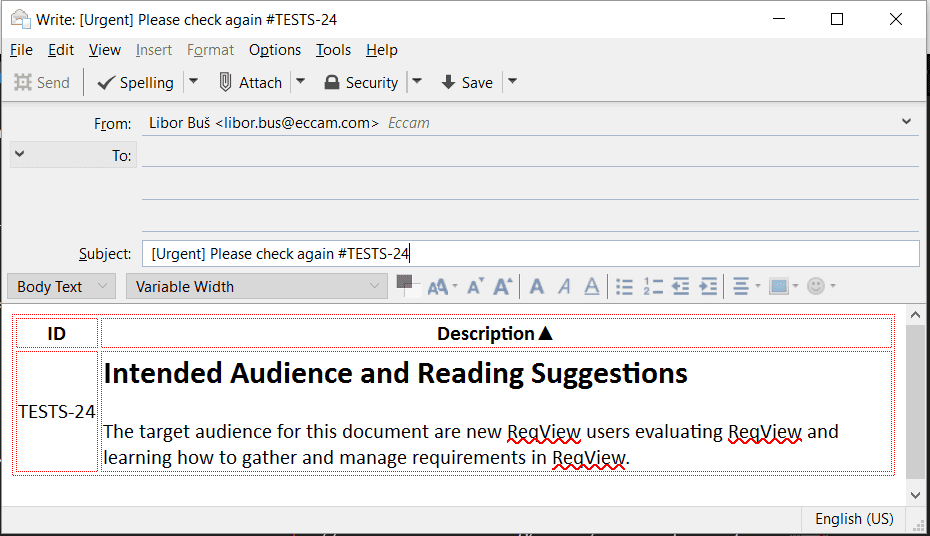
And then you can paste the data into other applications (MS Word, MS Excel or your email client) in HTML or CSV text format:
Print Documents
To print the current document, click File and select Print, or press CtrlP.
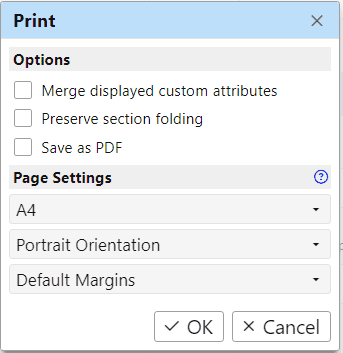
In the Print Options dialog, you can select if the displayed custom attribute columns will be compacted into the single Custom Attributes column if printed data will be filtered and sorted the same way as the table view, and if section folding will be preserved. Click OK.
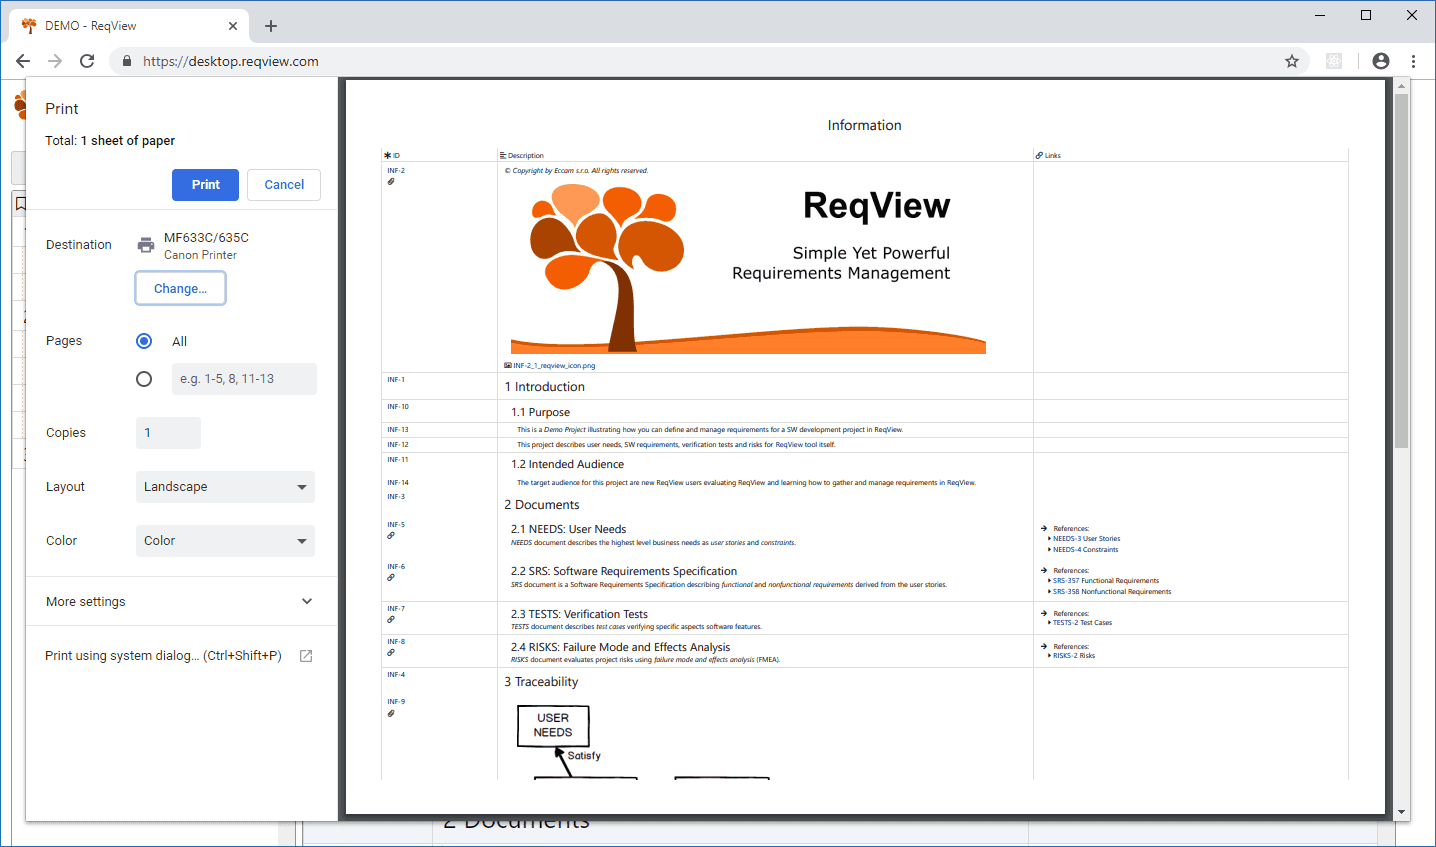
After confirming Print Options, the WebApp opens the browser Print dialog displaying a print preview. In this dialog you can select a target printer and further customize a printed document by changing page orientation, margins, and adding a custom header or footer:
Note: In case you need to export multiple documents and clickable links within the exported PDF please use export to PDF directly.
In a Chrome browser, you can export the opened document into PDF format using Print dialog by setting “Save as PDF”. In a Mozilla browser, you must install the Save as PDF add-on first and then select Save as PDF.