Detailed and consistent requirements traceability is essential for understanding the impact of proposed changes to high-level requirements before the changes are propagated downstream. It is also required to ensure compliance with several Automotive, Aerospace, Defense, and Medical industry standards.
Requirements traceability links represent relationship between requirements and other project artifacts. Consistent traceability in the project allows tracking these relationships to understand information from the related objects, for example if the test verifying a requirement passed or failed.
You can create directed traceability links between objects from the same document, between objects from different documents in the same project, or from linked projects. To make traceability analysis easier, links are usually organized into custom traceability link types.
Example: For a requirements project using the V-model development process, define satisfaction or verification traceability link types:
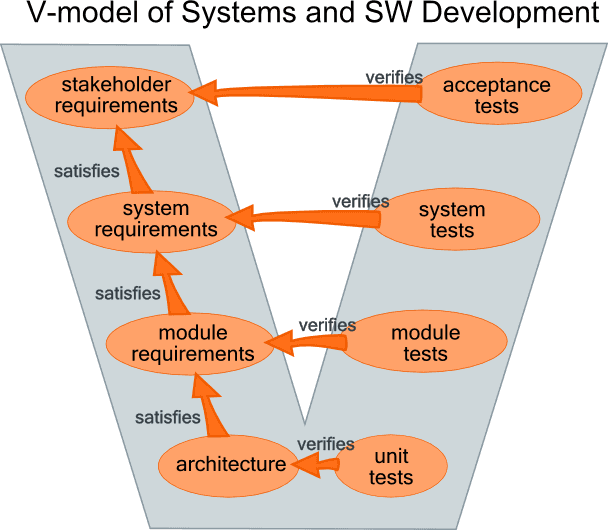
You can quickly list tests, which need to be updated after a requirement is changed, because all related tests can be filtered incoming traceability links by verification link type.
Note: We strongly recommend that you link requirements upwards, i.e., from derived to the source information. For instance, create traceability links from system requirements to stakeholder requirements. The main reason is that ReqView stores links in the document where links start. If you link requirements in the opposite direction you will be able to trace links, however, it would yield several usability issues during team collaboration and using linked projects.
Create Links
You can create traceability links between document objects within a single or multiple project windows easily.
To link a single document object with one or more document objects (1:N):
-
Select one or more document objects where the links start.
-
Drag the icon displayed in the first column ID.
-
Drop it at the document object where the links end.
-
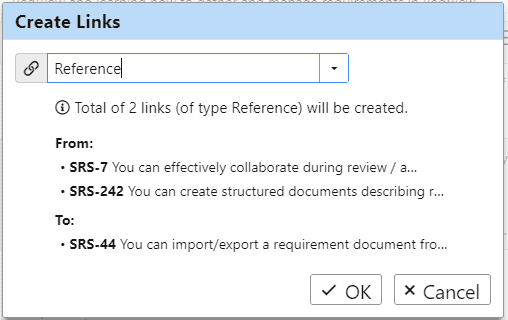
In the Create Links dialog, select a link type and review the traceability links between all source and target object pairs to be created.
![Create requirements traceability links dialog with link type dropdown Create requirements traceability links dialog with link type dropdown]()
Alternatively, to link two groups of document objects (M:N):
- Select one or more document objects where the links start.
- Click Edit or right-click on the selected document object and then select Start Link. You can also click in the toolbar or press CtrlL.
- Select one or more document objects where the links end.
- Click Edit or right-click on the selected document object and select Place Link. You can also click in the toolbar or press CtrlShiftL.
- In the Create Links dialog, select a link type and review the traceability links between all source and target object pairs to be created.
You can also create new links from the opposite direction by swapping steps 1-2 and 3-4 above. Or, you can repeat the selection of the source or target objects multiple times as required to create more links with the same set of source, or target objects.
At any time, you can cancel placing a link by clicking Edit and selecting Cancel, or pressing Esc. This will remove all link source and link target flags for current source and target objects.
Display Links
To display traceability links, show the Links column in the requirements table or the Links right pane:
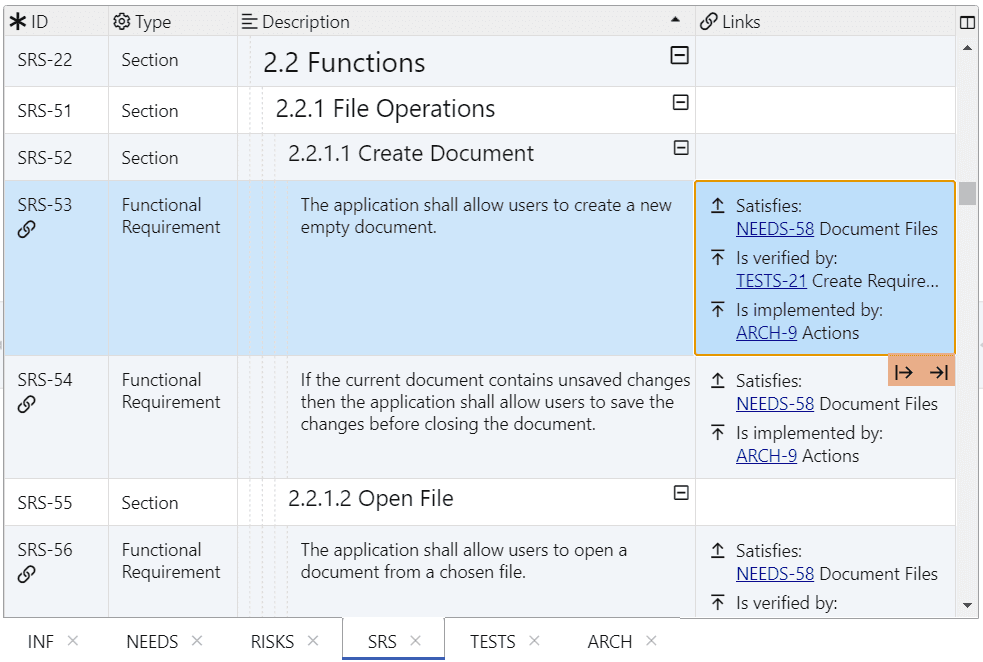
Links column displays links grouped and sorted according to the following default rules:
- outgoing links are displayed before incoming links,
- links are grouped by link type sorted in alphabetical order,
- links for the main project are displayed before links for linked projects,
- links are sorted by document object ID alphabetically.
To sort links by their document section order (instead of alphabetical), click Edit, select Preference and then check the Sort links option in the Preferences dialog.
Example: Open the SRS document in the Example Project. Requirement SRS-83 satisfies user stories NEEDS-32 and NEEDS-68. If the Sort links option is enabled, NEEDS-68 is displayed in the Links column before NEEDS-32 because it precedes in the NEEDS document
To display additional links, check the following options in the Preferences dialog:
- Show parent link — display the object’s parent section in the document structure.
- Show origin and inherited links — display link from a copied object to its origin and all links inherited from the origin.
You can also use the Traceability Wizard to add new traceability columns displaying selected traceability links only, e.g., only satisfaction links to upstream requirements.
Preview Linked Objects
To preview full text description, custom attributes and links of a linked requirement in a popup, mouseover a link displayed in the Links column, in a custom traceability column, or in the Links pane:
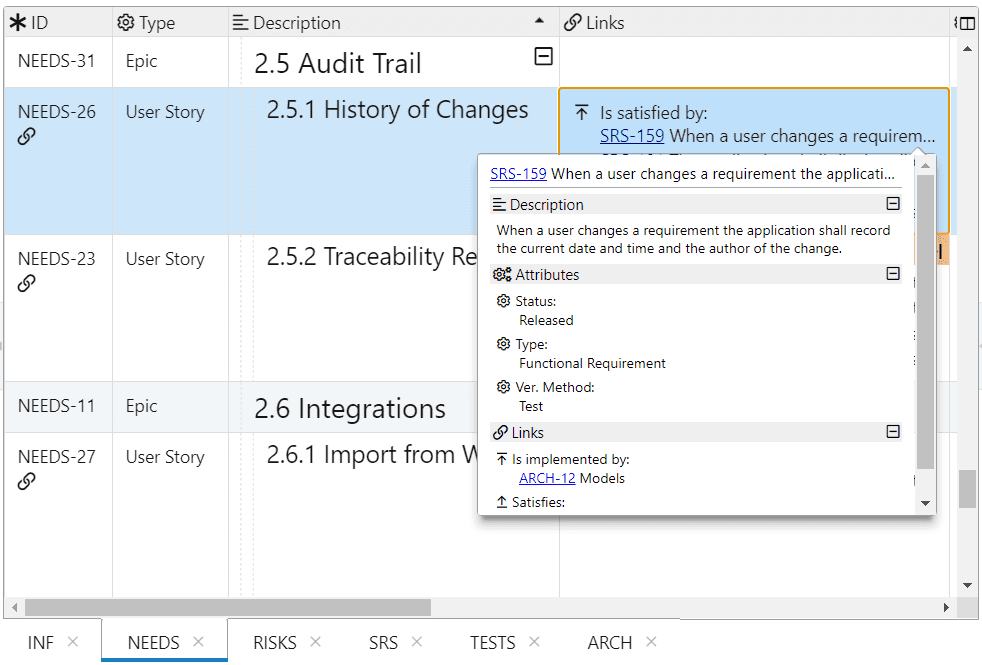
Browse Links
To navigate to a linked object, simply click on the link. You can also right-click on the link in the Links column or in the Links pane and choose Go To or View in New Window action from the context menu. See also Project Windows.
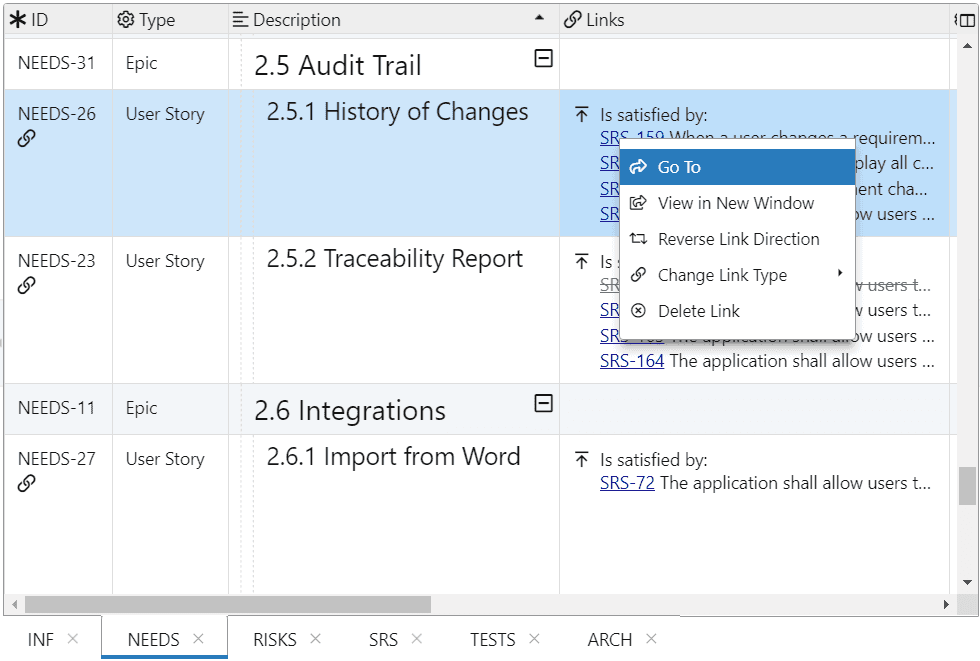
To navigate back or forward in the link browsing history, click View, mouseover Link Browsing, and select Go Back or Go Forward respectively. Alternatively, click / icon in the toolbar, or press Alt← / Alt→.
Traceability Column Wizard
You can extend document table views by adding Traceability Columns to display live Requirements Traceability Matrix (RTM). With Traceability Column Wizard, you can easily configure new traceability columns displaying linked objects in a tree with up to three levels. To open the wizard, click Document, mouseover Add Template Column, and select Traceability Wizard:
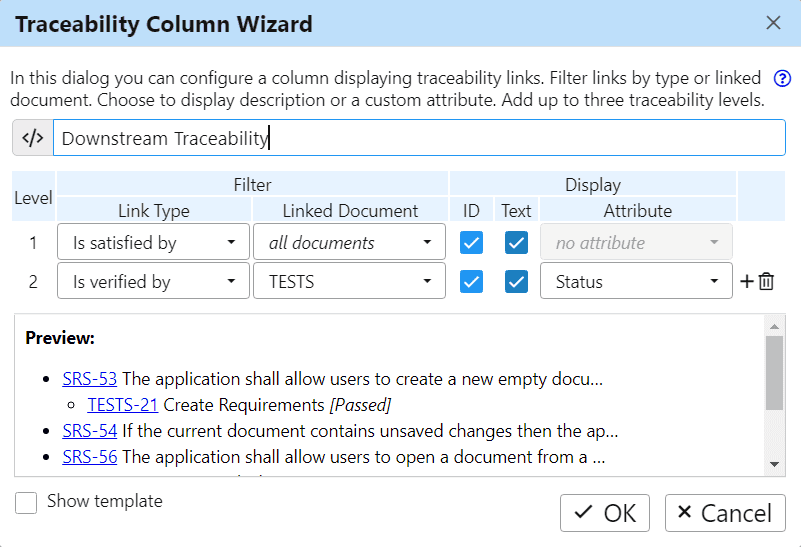
In the Traceability Column Wizard dialog, set the displayed traceability links conveniently in a table. Each table row represents a traceability level:
- Set Link Type to filter the links by a link type and direction
- Set Linked Document column to filter the links by a linked document
- Enable Text to display the description of linked objects
- Choose Attribute to display the attribute value for the objects from the chosen linked document
The Preview section of the dialog shows the template column output for the selected document object. Check Show template to display the generated template code in the dialog. Press OK to add the new traceability column into the table view. You can further edit the generated template code, see Template Columns.
Custom Traceability Reports
You can easily create a custom end-to-end traceability report to analyze requirements coverage or impact of their changes. For an example, see HTML Traceability Report:
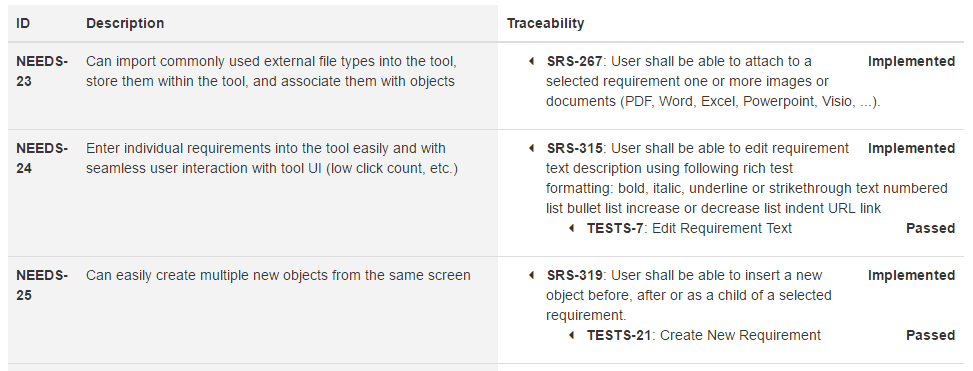
Filter Traceability Links
You can apply a powerful filter to manage traceability. For instance, find missing links, filter links to the origin, and track changes in the linked object by filtering suspect flags. See examples on the Filter Links web page.
Edit and Delete Links
To edit or delete an existing link, right-click on the link in the Links column or the Links right pane and choose Reverse Link Direction, Change Link Type, or Delete Link action from the context menu:
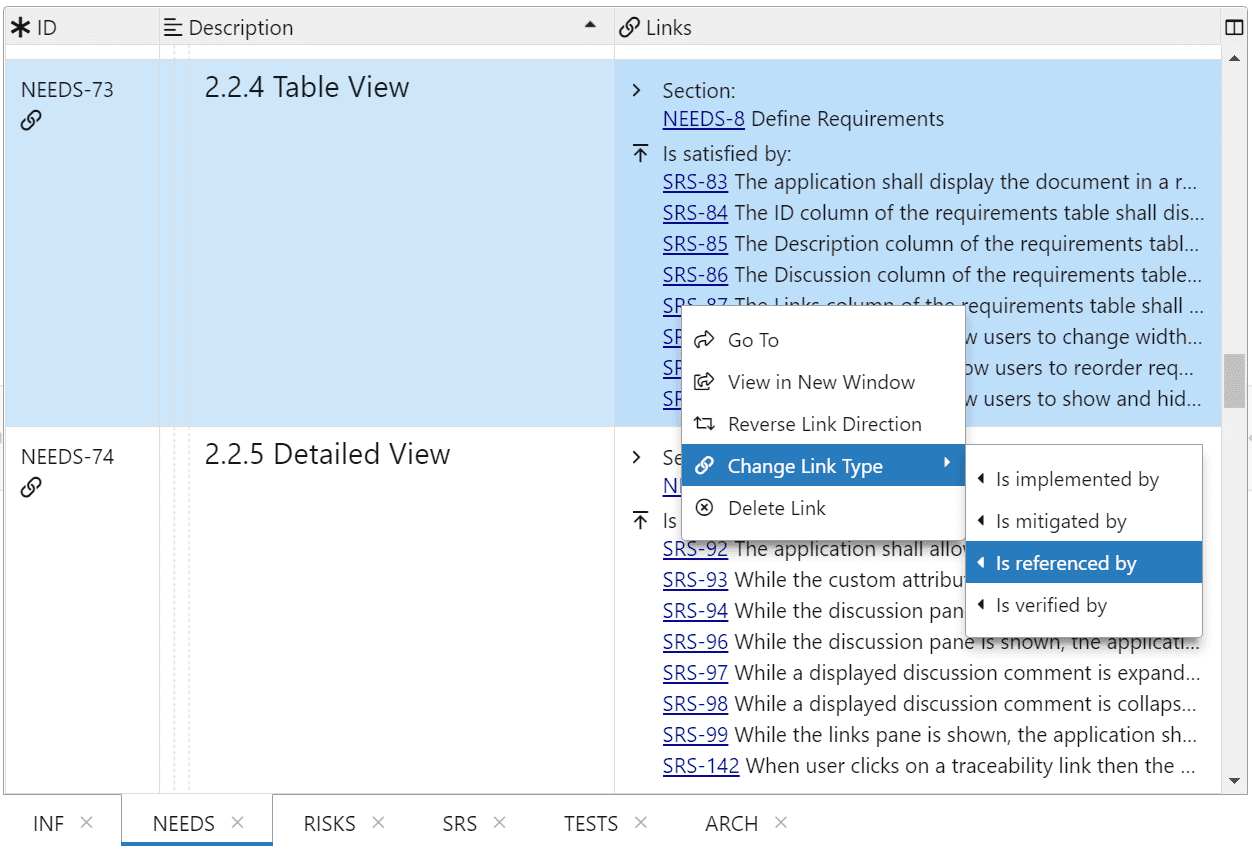
Note: If the linked objects are in a read-only document, then the edit or delete command fails with an error message.
Copy or Inherit Links
When you copy an object with existing links, you can choose whether to ignore, duplicate, or inherit traceability links from the copied origin to its new copy. For more information, see Copy Objects.
If an object is only copied with Copy Links, the copy stores duplicated links. Any change in the links of the original object will not affect the corresponding link of the copy.
If an object is copied with Link to Origin, only a single origin reference is created with the copy and its origin, you can display a link for each copy to its origin and the inherited links from the origin. Click Edit, select Preferences, and select Show origin and inherited links. All changes to the original object links are propagated to the displayed inherited links for the copy. The inherited links from the origin are navigable, but not editable in the copied object.
Example Scenario:
Creating an origin reference from a copy to its origin is useful if you want to copy all system requirements from a SRD (System Requirements Document) into a CRD (Customer Requirements Document) to manage separate documents for the SRD and a CRD for each customer.
-
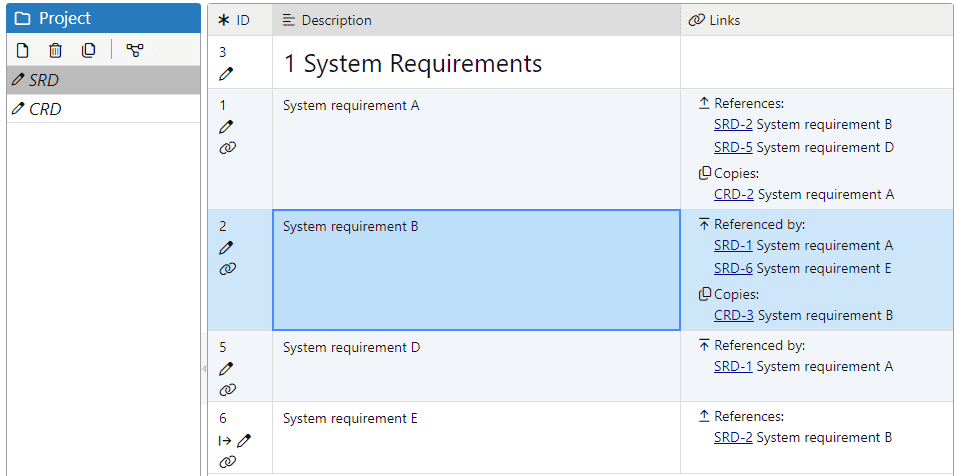
Let’s assume you have SRD document with two system requirements SRD-1 and SRD-2 which we want to copy to a new CRD:
![System requirements document with Links column System requirements document with Links column]()
-
In the CRD, select the section where you want to place the copied system requirements. Press CtrlV to open the Paste menu and select the Link to Origin option.
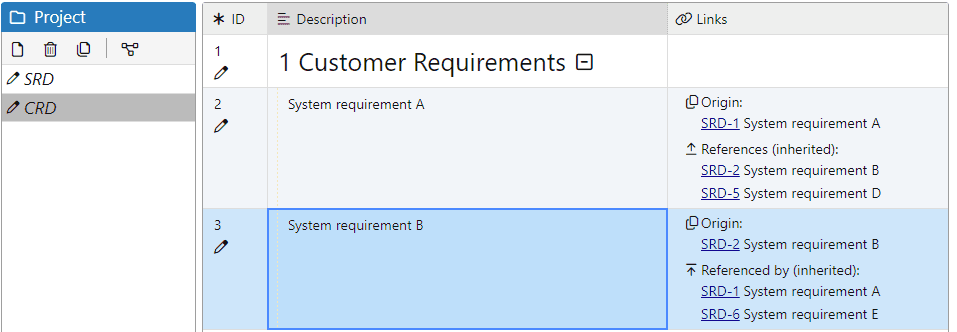
As a result, two new objects CRD1-2 and CRD1-3 are created and linked to the original SRD object. In the Links column, you can see the Origin link together with all inherited traceability links from the original SRD object:
![Customer requirements document with inherited traceability links Customer requirements document with inherited traceability links]()
-
Link SRD-1 to a new object SRD-5, and SRD-6 to a new object SRD-2:
![SRD with new traceability links SRD with new traceability links]()
-
You can also see the corresponding inherited links for the new links in SRD in the copied CRD objects:
![CRD with new inhterited links CRD with new inhterited links]()
Configure Project Traceability
To configure project traceability in the Project Traceability dialog, click Project and select Project Traceability:
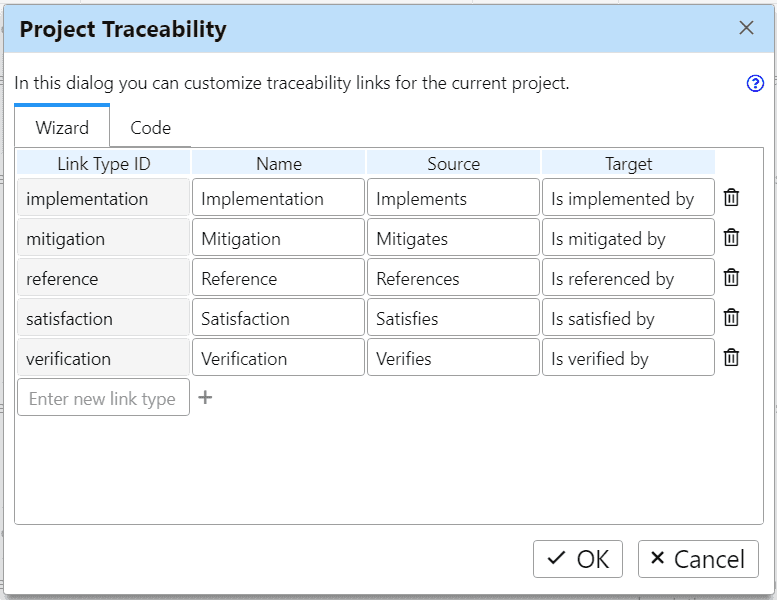
The dialog is open as read-only if you edit a shared Project Folder (see Shared Drive). You can edit the traceability configuration, after you press Edit in the dialog and no other user is editing the project at the same time.
Project Traceability Wizard
In the Wizard tab of the Project Traceability dialog, you can conveniently edit traceability link types in a table. Each table row represents a link type and you can set for each type the following columns:
- Link Type ID — unique link type identifier, for example "satisfaction". We strongly recommend using IDs without white spaces (e.g. using camel case) to simplify their handling in export templates.
- Name — link type name, for example "Satisfaction".
- Source — short text describing the role of the link source, for example "Satisfies".
- Target — short text describing the role of the link target, for example "Is Satisfied By".
To add a new link type, select the text box under the table, enter new link type ID and press Enter. The corresponding new row is inserted into the table.
To delete an existing link type, click on the right of the corresponding row.
Link Type Definition
In the Code tab of the Project Traceability dialog, you can configure project traceability in JSON format:
{ <linkTypeId>: { "name": <string>, "source": <string>, "target": <string>, "suspect": <array> }}Each link type is represented as an object with linkTypeId key set to a unique identifier and the following properties:
- name — link type name
- source — short text describing the role of the link source
- target — short text describing the role of the link target
- suspect — list of suspect attributes, see Manage Suspect Links
Example: Define verification links leading from test cases to verified requirements:
{ "verification": { "name": "Verification", "source": "Verifies", "target": "Is Verified By" }}Example: Define satisfaction links leading from low-level requirements (e.g. system requirements) to high-level requirements (e.g. stakeholder requirements):
{ "satisfaction": { "name": "Satisfaction", "source": "Satisfies", "target": "Is Satisfied By" }}Link Projects
Apart from traceability links in the context of one project, you can also link requirements from different projects. You can find this feature extremely useful if you need to split projects with a high number of documents, reuse requirements across projects, and control versions of linked projects independently. For more information, see Linked Projects.
