ReqView 2.15.0 Beta 1 — Linked Projects
Split projects with a high number of documents, reuse requirements in several products, and manage project versions independently.
Benefits of Linked Projects
ReqView 2.15 introduces a new feature called Linked Projects, allowing you to link requirements between ReqView projects. You can find this feature extremely useful if you need to split projects with a high number of documents, reuse requirements across projects, and control versions of linked projects independently.
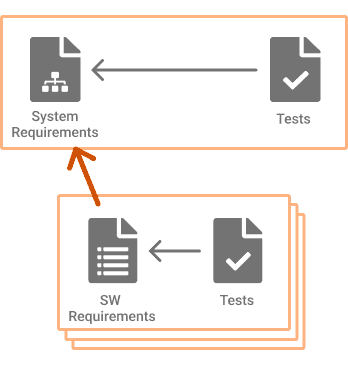
Project Breakdown
Requirements for complex systems are described on several levels of abstractions, which leads to a high number of documents. For instance, consider a system product consisting of 20 HW/SW modules and its V-model with 3 levels of abstraction, similar to the Example System Project.
A single ReqView project storing just requirements and test cases will consist of more than 40 documents. This is quite a lot of information to be managed by a single person. So you have a team of domain experts, each working mainly with just a few related requirements documents (e.g., describing only a single module).
How to let your team members focus better on the information they need? Store your requirements documents in multiple linked projects and allow users to develop each project independently.
Requirements Reusability
If you develop several similar products, you try to share reusable information as much as possible to save your efforts. For instance, you may want to reuse:
- external source documents
- regulatory standards
- HW/SW requirements and tests
How to reuse this information across products? Extract shared documents into linked projects. Then link product requirements to the single source of truth stored in a linked project.
Independent Version Control
Most system products are developed iteratively. At the end of each iteration, the current set of top-level requirements is reviewed and saved as a new version (baseline). Then downstream requirements (system or HW/SW requirements) are updated according to changed upstream requirements. Finally, downstream requirements are reviewed and saved as a new version.
How can you version multiple levels of requirements independently? Split your requirements into several linked projects and manage them in a version control system, such as Git or Subversion (SVN). Connect downstream requirements projects to a specific baseline of upstream requirements.
Manage Linked Projects
Connect Projects
You can connect a project to other Project Folders or Project Files to display their content or create traceability links. Let’s call the project opened in the current window as the main project and connected projects as linked projects.
To connect the main project to a linked project, click Project, mouseover Linked Projects, select Connect Folder or Connect File, and select the path of a linked project. Similarly, you can reconnect the main project to another linked project path later.
The list of linked projects is persisted in the project file or folder of the main project.
Example: Open the Example Project, save it to a local folder and set its ID to ReqView-APP. Then connect it to a linked project STANDARDS storing documents describing IEC-60601 and other industry standards used in your company.
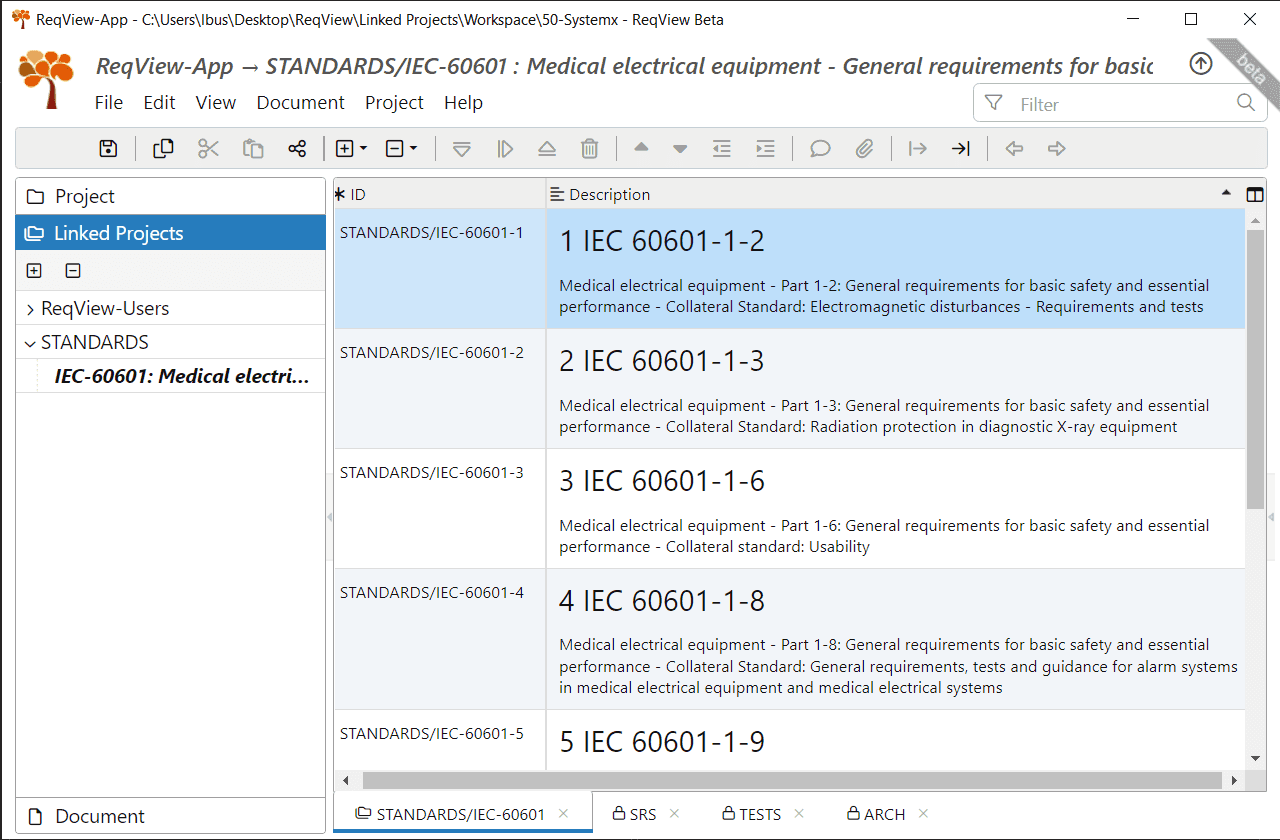
Note: You can connect projects in both directions if you need to navigate between them easily.
Display Linked Projects
You can load a linked project from the file system to display its documents and outgoing traceability links leading to other projects. The content of loaded linked projects is persisted for offline usage automatically. You can unload an unused linked project to reduce memory usage or to hide all traceability links that lead from this project.
To display linked projects, click View, mouseover Left Panes, and select Linked Projects pane, or press CtrlAltO. To load or unload a linked project, double click on its ID or click button and select Load or Unload from the menu.
To display a document from a loaded linked project in the current project window, click on the document ID in the Linked Projects pane.
Edit Linked Projects
Documents from the main project can only be edited in its own project window. Documents from the linked projects are read-only.
To edit a linked project in another application window, open the Linked Projects pane, click button and select Edit from the menu.
To reload all linked projects and display saved changes in the main project, click Project and select Refresh Project, or press CtrlR.
Manage Links Between Projects
You can create traceability links from the main project to a loaded linked project using a link type defined in the main project. Traceability links are persisted in the main project, which is the link source. For instance, assume that the main project DEMO is connected to the linked project EXT as explained in the previous section. When you create traceability links from project DEMO to EXT, the links will be stored in project DEMO.
Create, edit, delete, view and navigate links between projects similarly as links within a project, see Requirements Traceability Links.
Example: Display the Links column listing reference traceability links from document SRS in the main project ReqView-App to document IEC-60601 in the linked project STANDARDS.
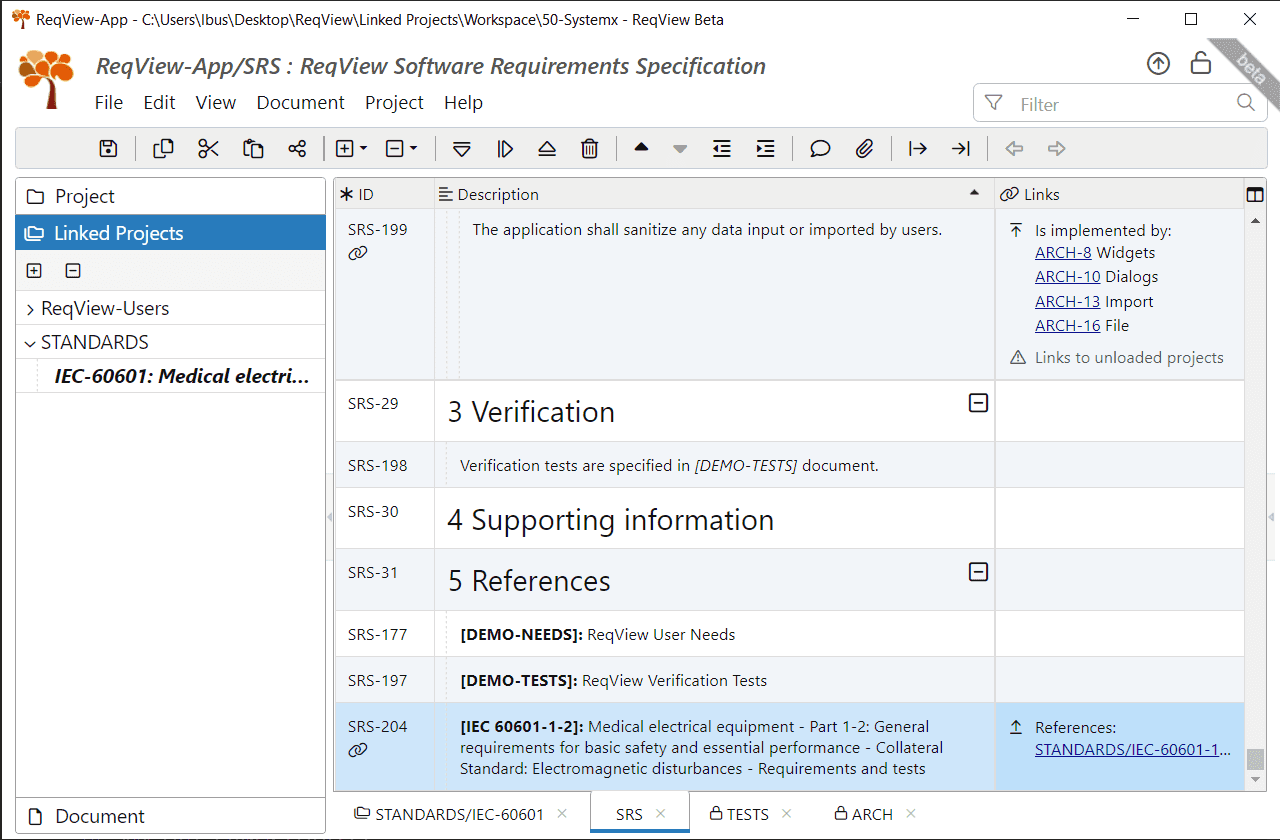
Note: If there are links to an unloaded linked project then the Links column displays a warning message. For example, see the Links column for SRS-199 at the previous screenshot. Right-click the warning message to load linked projects from the context menu to display the links.
Disconnect Linked Projects
To disconnect a linked project from the main project, open the Linked Projects pane, click on the right of the linked project ID, and select Disconnect from the menu.
Manage Versions of Linked Projects
You can manage versions of ReqView projects in Git and Subversion (SVN) version control system. SVN is very flexible and supports many ways how to organize repositories to fit different use cases, see Strategies for Repository Deployment.
But how to organize repositories storing ReqView linked projects? Let’s explain two typical repository layouts — one for simple products with few projects and another for complex products with many projects.
Set up Repository for Simple Products
This section describes how you can lay out your repository if you have a simple product structure with a few linked projects and need to work with all of them easily. See the next section Set up Repository for Complex Products if you have multiple products, subsystems, reusable components and need more control.
Organize Projects Under Trunk & Tags
Create the following top-level directories in your repository: trunk storing the main line of requirements development, and tags storing requirements baselines. For each ReqView project, create a subdirectory of /trunk and /tags.
Example: Store the Example System Project in a repository with the following hierarchy of directories.
/ trunk/ STAKEHOLDERS/ SYSTEM/ SW1/ SW2/ ... tags/ STAKEHOLDERS/ SYSTEM/ SW1/ SW2/ ...Check out All Projects
The main advantage of organizing the repository, as explained in the previous section, is that you can check out all ReqView projects from a repository into a working copy by running just a single svn checkout command:
$ mkdir <working_copy> $ svn checkout <svn_repository>/trunk <working_copy>Start With a Single Repository
Start with managing versions of all ReqView projects in a single SVN repository. You can restructure the repository easily as needed. A little downside is that SVN uses the same revision numbers per repository. On the other hand, SVN revision numbers have no special meaning.
Set up Repository for Complex Products
This section describes how you can lay out your repository if you have many linked projects describing multiple products, subsystems, reusable components, etc.
The main advantage compared to the layout described in the previous section Set up Repository for Simple Products is that projects are better separated, and it is easier to work with selected projects only.
Organize Trunk & Tags Under Projects
Group your projects into top-level directories in your repository. For each project directory, create two subdirectories: trunk storing the main line of requirements development and tags storing requirements baselines.
Example: Store the Example System Project in a repository with the following hierarchy.
/ STAKEHOLDERS/ CUSTOMER1/ trunk/ tags/ ... SYSTEMS/ SYSTEM1/ trunk/ tags/ ... SOFTWARE/ SW-1/ trunk/ tags/ SW-2/ trunk/ tags/ ...Check out Selected Projects
Most users are only interested in a small subset of all projects. For instance, they update stakeholder requirements for a specific customer. Or they develop a specific SW component.
There are two common ways to set up a working copy for a group of users with the same intent automatically:
- Create a script to run several
svn checkoutcommands for selected projects. - Create a workspace directory in the repository and set its
svn:externalproperties to check out selected projects.
Note: Working copies containing a different set of linked projects should have the same fixed structure of directories to load the projects in ReqView correctly.
Example: Assume the repository storing the Example System Project shown in the previous example. Create a script to set up the working copy for developing module SW2, which needs to edit the latest version of SW2 requirements and see version v1.0 of SYSTEM1 and CUSTOMER1 requirements. Check out all projects as siblings of the working copy directory.
mkdir SW2-WScd SW2-WSsvn checkout <svn_repository>/SOFTWARE/SW2/trunk SW2svn checkout <svn_repository>/SYSTEMS/SYSTEM1/tags/v1.0 SYSTEM1svn checkout <svn_repository>/STAKEHOLDERS/CUSTOMER1/tags/v1.0 CUSTOMER1Example: Assume the same repository and a group of users developing module SW2. Create a workspace directory and set its svn:external properties to check out the specific versions of all needed linked projects.
-
Create folder WORKSPACES in the SVN repository and check it out to a working copy.
$ svn mkdir <svn_repository>/WORKSPACES$ svn checkout <svn_repository>/WORKSPACES <ws_working_copy> -
Create a new directory SW2 for the workspace and add it to the local working copy.
$ cd <ws_working_copy>$ mkdir SW2$ svn add SW2 -
Open an editor (e.g., notepad) to set the
svn:externalsproperties for the working copy.$ svn propedit svn:externals . --editor-cmd=notepad -
Set the
svn:externalproperties in the editor.^/SOFTWARE/SW2/trunk SW2^/SYSTEMS/SYSTEM1/tags/v1.0 SYSTEM^/STAKEHOLDERS/CUSTOMER1/tags/v1.0 STAKEHOLDERS -
Commit the workspace to the repository to share it with other users.
$ svn commit -m "Set up SW2 workspace" -
When another user checks out the workspace, his working copy is set up automatically.
$ svn checkout <svn_repository>/WORKSPACES/SW2 <sw2_working_copy>
Split Repositories
After some time, you may need to split your repository. For instance, when the repository contains too many projects or you need to restrict user access on the repository level.
To extract selected project(s) into another repository, run the following commands:
svnrdump dump— create a dump file from an existing repositorysvndumpfilter include— filter an SVN dump file to contain only the selected project(s)svnrdump load— load a filtered dump file into the new repository
Example: Extract ReqView project(s) storing stakeholder requirements from the repository structured as explained in the previous section.
$ svmrdump dump <svn_repository_orig> | svndumpfilter include "STAKEHOLDERS" | svmrdump load <svn_repository_new>Maintain Linked Projects
Split Existing Projects
You can move selected documents from the main project into a new linked project. We recommend moving documents from top to bottom levels. The main reason is that outgoing links leading from a moved document are redirected automatically. However, if a moved document has incoming links from a linked project, the links cannot be redirected because the linked project is read-only.
To split the main project, click Project, mouseover Maintenance, and select Move Documents. In the Move Documents dialog select documents to move, enter the ID of the new project, press OK, and finally, select the path for storing the new project.
Example: Split the Example Project DEMO into new projects, STAKEHOLDERS and SW-APP. Move documents from top to bottom levels as recommended.
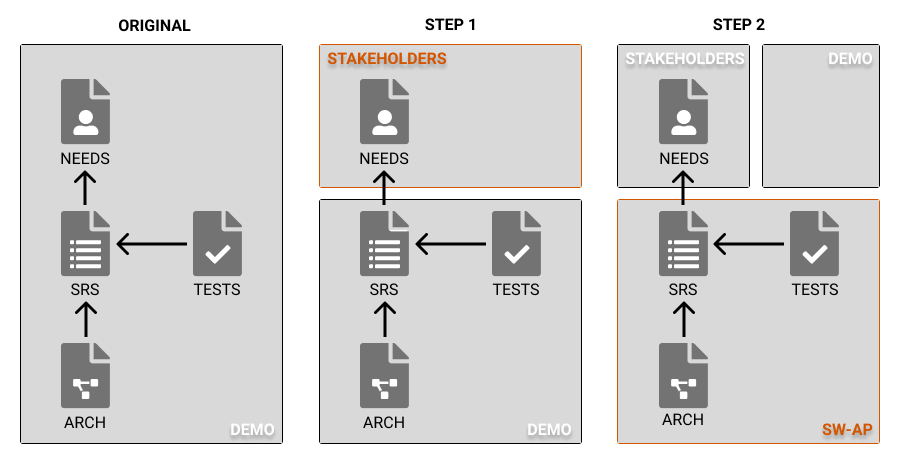
- Move document NEEDS (stakeholder requirements) from project DEMO into linked project STAKEHOLDERS. The new project will have no outgoing links to other projects. Links from the DEMO project will be redirected to document STAKEHOLDERS/NEEDS automatically.
- Move documents SRS (software requirements), TESTS (software tests), and ARCH (software design) from project DEMO into project SW-APP.
Example: Split the Example System Project with 3 traceability levels to new projects STAKEHOLDERS, SYSTEM, RISKS, SW1, SW2, …, SWn. Move documents from top to bottom levels as recommended.
- Move top-level documents (stakeholder requirements and validation tests) into a new linked project STAKEHOLDERS. The new project will have no outgoing links to other projects.
- Move risks-related documents (FMEAs) into a new linked project RISKS. The new project will have no outgoing links to other projects.
- Move 2nd level documents (system requirements and verification tests) into a new linked project SYSTEM. The new project will have outgoing links to linked projects STAKEHOLDERS and RISKS.
- For each reusable software module, move 3rd level documents (software requirements and verification tests) into a new linked project SWx. The new project will have outgoing links to linked project SYSTEM.
Note: With the current version, you can move documents to new linked projects only. Contact us if you need to help with the reorganization of your existing linked projects.
Bulk Redirect Links
If you move a document with incoming links from an existing linked project, then you need to redirect dangling links manually. To redirect dangling links, open the existing linked project, click Project, mouseover Maintenance, and select Bulk Redirect Links. In the Bulk Redirect Links dialog, select the current target project and document(s) and enter the new target.
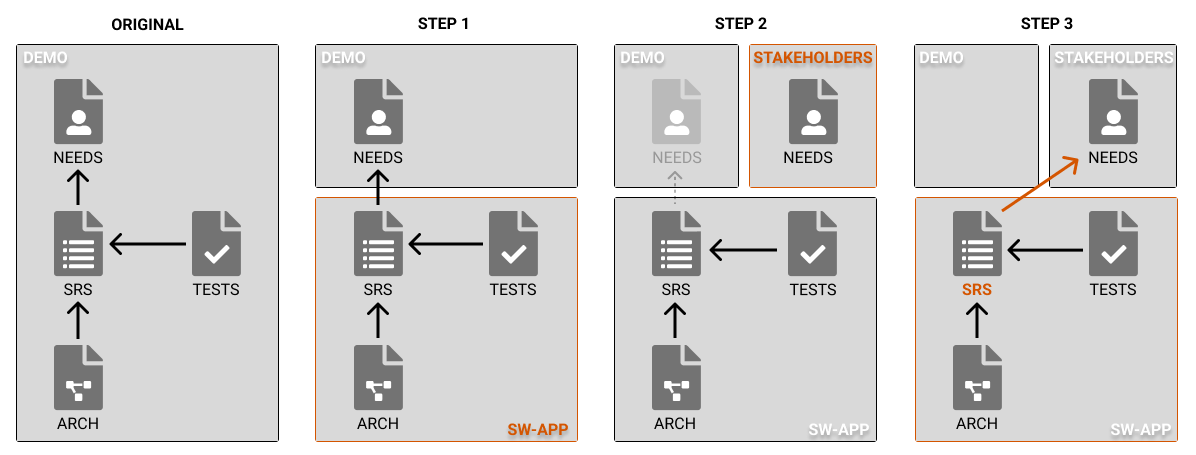
Example: Split the Example Project project DEMO into new projects, STAKEHOLDERS and SW-APP. Move documents from bottom to up levels, despite the recommendation explained in the previous section.
- Move documents SRS (software requirements), TESTS (software tests), and ARCH (software design) from project DEMO into linked project SW-APP. The new project will have outgoing links to document NEEDS in the original project DEMO.
- Move document NEEDS storing stakeholder requirements from project DEMO into linked project STAKEHOLDERS. Outgoing links from project SW-APP pointing to the moved document DEMO/NEEDS will become dangling.
- To redirect dangling links, open project SW-APP in a new window, and in the Bulk Redirect Links dialog choose DEMO/NEEDS as the current target and STAKEHOLDERS/NEEDS as the new target.
Try ReqView Beta
- Download ReqView Beta
- Request free trial to try all advanced features
- Let us know how the new Linked Projects feature suits your needs