Customize ReqView to Support Your Development Model
In this chapter, we will demonstrate how to set up ReqView document templates to support your specific development model.
Avy Strominger
Structure of ReqView Projects and Documents
ReqView data is organized into projects. Each ReqView project consists of one or more documents storing project artifacts; for example, high-level stakeholder requirements, system requirements, software requirements, risk management programs, test plans, etc. ReqView projects can be linked to form a project hierarchy.
Let us describe various document-wide ReqView entities, and discuss which entities you can customize to support your specific development model:
-
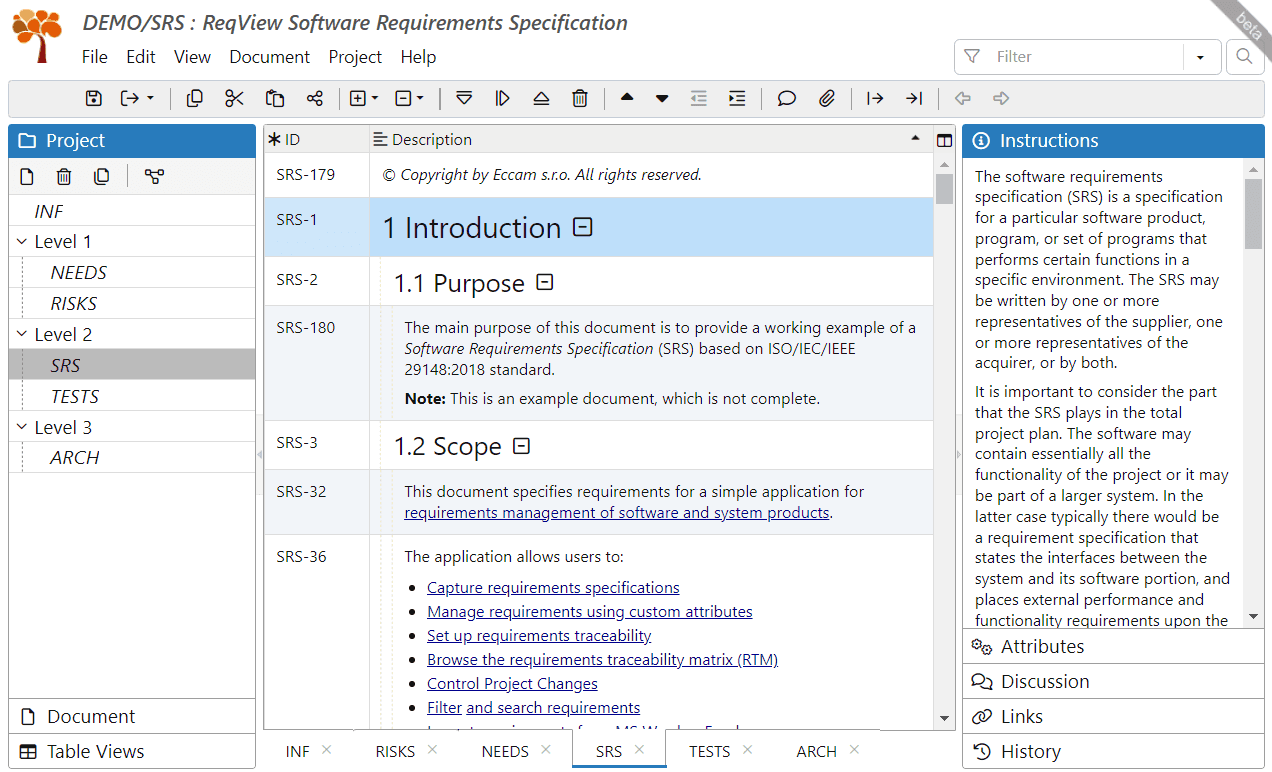
Documents: ReqView documents consist of document objects organized into a tree hierarchy with numbered sections, as in a Word document. Each document corresponds to a project artifact, for example: a system requirements document, a system design document, etc. The document determines the structure, format, and contents of each type of project artifact.
ReqView documents store the definitions of Custom Attributes, Template Columns, and Table Views described below, as well as the document contents entered by the user, which are captured in document object attributes.
-
Document Objects: Each document object is identified by the attribute id storing an automatically generated unique ID. You can set its text attribute to describe the requirement or the project artifact captured by this document object. Or, you can set its heading attribute to create a new numbered section within the document (like the “Heading” paragraph style in MS Word). Both attributes heading and text are displayed in the main column called Description. You can display additional columns with user-defined Custom Attributes and Custom Template Columns.
-
Custom Attributes: For each ReqView document, you can define custom attributes to extend the information available for each document object and to augment the document object in a specific way to support your workflow. For example, you can define the status attribute for requirements, helping you to manage the requirements life-cycle.
See Custom Requirement Attributes for more information.
-
Custom Template Columns: For each ReqView document, you can define custom template columns to display additional information about each document object computed programmatically. For example, you can display the Risk Priority Number (RPN) calculated from the risk severity, probability, and detection rating stored in separate custom attributes.
See Review Requirements Documents > Template Columns for more information.
-
Table Views: Document objects are displayed in table views. The table view presents the document object information in columns, as in an Excel spreadsheet. You can choose which columns to display, and reorder or resize columns easily to adjust the current table view to your specific needs.
Each table view is given a user-defined name and stores the configuration of the columns (columns visibility, order, and width). Any user can select the desired table view later to restore the configuration of table columns for document display, export, or print.
See Review Requirements Documents > Table Views for more information.
-
Traceability Links: A traceability link is a typed, directed relation between two ReqView document objects. The link type defines the relation, for example: an Implementation link from an object in a design document to the appropriate requirement object in the requirements document that it implements. Traceability link types are defined and customized in the ReqView project.
See Requirements Traceability Links for more information.
The following screenshot illustrates a Project Workspace displaying these entities:
Customize Document Templates
It is a well-known, good systems engineering practice to enforce a standard document structure, format, and contents called Data Item Description (DID) that suits the development process for each document type. This standardization helps project engineers in writing the documents and also reduces the risk of neglecting important content. You can create templates for each document type, that match your development process and standards, to be used throughout the project.
When you create a new document in ReqView, you can base it on a Document Template, which defines the initial document structure, format, and contents (like sections and paragraphs), as well as an initial set of custom attributes, custom template columns, and table views. Thus, using document templates is a great way to standardize ReqView documents.
ReqView not only comes with a set of predefined document templates but also enables you to create document templates for each kind of desired document, that suits your development process and existing or required practices. ReqView document templates are just regular ReqView documents saved in a specific way.
Once a new document is created based on a document template, you can later add specific custom attributes and table views to the document, or alter the custom attributes and the table views copied from the template, should such a need arise.
In the next sections, we will describe how to create and maintain a reusable document template for the UNEX project:
- Create a Templates Area storing document templates for users who need to create standardized documents.
- Create and initialize a new project storing document templates.
- Create the bare-document template (the “template of the templates”).
- Create the System Requirements Document (SSS) template.
It is important to note that these steps are usually done by the Chief System Engineer of the project or by the project Quality Assurance team. All other project engineers using ReqView need only to access the Templates Area, storing the shared document templates.
Implement Templates Area
When a ReqView user wishes to create a new document that is based on a document template, ReqView will need to access the document template file (.reqw) specified for the creation of the new document. Thus, document template files should be stored in a place, that is accessible to all ReqView users. We will call this place the Templates Area.
The simplest way to implement the Templates Area is to use a global directory on a Shared Drive hosted on a file server located on your premises or in the cloud (like Microsoft SharePoint, Microsoft OneDrive, Google Drive, or Dropbox). All users will need read access to this directory, while the maintainer of the document templates will need write access, to store and update the document template files.
Another way to implement the Templates Area is to use a Version Control System (VCS), such as Git or SVN. This will facilitate easy distribution of document template files needed by regular users for creating new documents from templates, as well as keeping versioning history for the document templates.
For the UNEX project, we demonstrate how to implement the Templates Area using the global Git repository named MIL-STD-498-Templates. Regular users can use a preferred Git client to clone this repository to a local directory and get its updates.
Create Project Storing Document Templates
Creating and maintaining ReqView document templates is an easy task because they are just regular ReqView documents saved in a specific way. For this purpose, we will create the ReqView project called MIL-STD-498-DIDs that will store all our custom template documents — one document for each project artifact type (system requirements, system design, software requirements, risk management program, test plan, etc). This project will also be used to maintain the document templates, should a need to update them arise.
New ReqView projects are typically set up by an advanced user, such as the project Chief Systems Engineer. This user initially creates a global Git repository for the new project, clones the Git repository locally, and initializes the new project with the first document. Any other user who wants to access an existing ReqView project for the first time only needs to clone the Git repository to the Local Workspace later. When a user commits his project changes ReqView will automatically push the commit to the global Git repository.
Let us see how to create and initialize the MIL-STD-498-DIDs project storing document templates.
1. Create Global Git Repository:
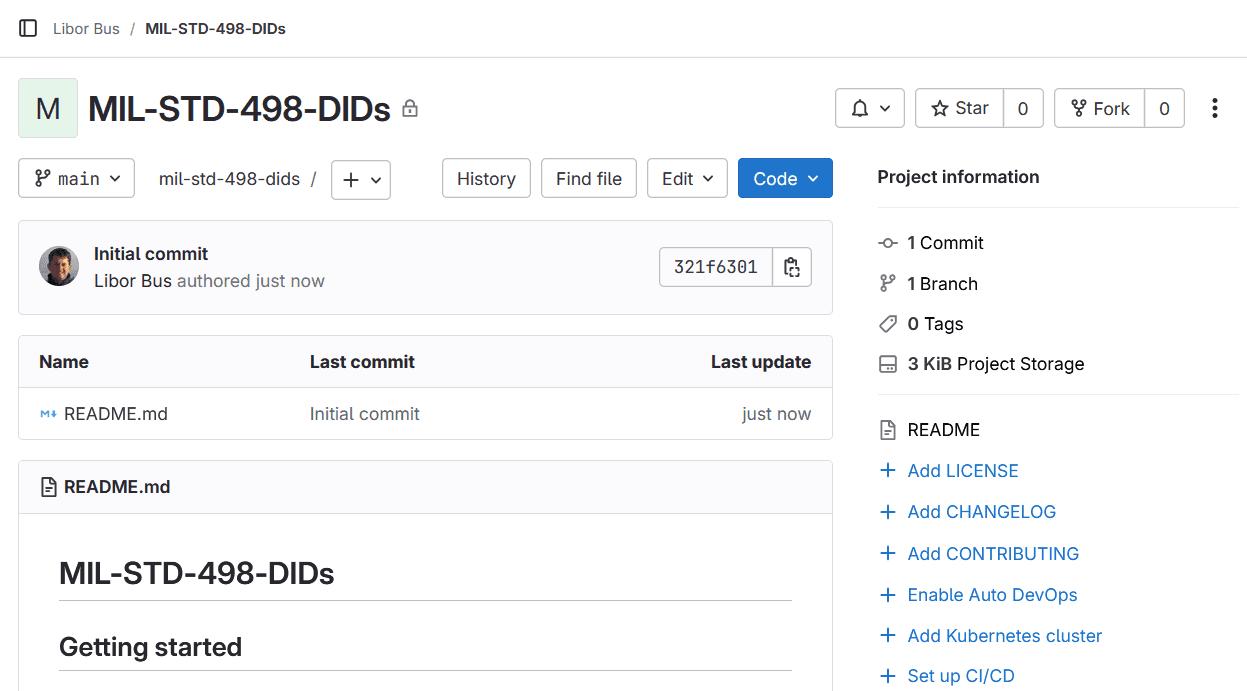
The exact details of how to create a new, empty global repository on the Git server depend on the specific Git provider you are using (GitHub, GitLab, Atlassian BitBucket, and Microsoft Azure DevOps, etc.).
For instance, to create a new empty global repository at GitLab:
-
Log in to GitLab, using a username that has administrator rights for the desired project.
-
Once logged in, GitLab will display the Projects page for your account. Hit the New project button on the top-right side of the screen.
-
GitLab displays the Create new project page. Select Create blank project, enter “MIL-STD-498-DIDs” as the project name, complete any other desired project properties (like public or private visibility level, project configuration, etc.), and hit Create project. For more information see GitLab Docs > Create a project.
-
Save the HTTPS URL of the Git repository, which looks like https://gitlab.com/<GitLab-name-space>/mil-std-498-dids.git, for further reference. You will need this URL later in order to clone the repository. You can also find the HTTPS repository address later, on the project web page, under the Code pull-down button.
![Empty Project at GitLab Empty Project at GitLab]()
2. Clone Git Repository Locally:
To create a local clone of the global Git repository for the MIL-STD-498-DIDs project:
-
Create a new empty directory named “MIL-STD-498-DIDs” in the Local Workspace.
-
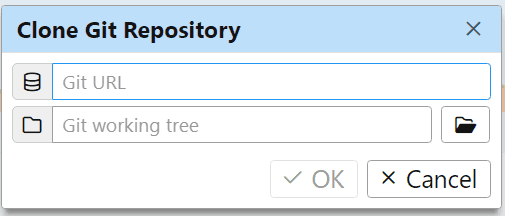
Select File->Git->Clone Repository from the main menu to open the Clone Git Repository dialog:
![Clone Git Repository dialog in ReqView Clone Git Repository dialog in ReqView]()
Enter the Git URL (for example: https://gitlab.com/<GitLab-user-name>/mil-std-498-dids.git), select the location of the new directory you have just created in the previous step, and hit OK.
-
ReqView will now try to open the cloned project. Since the repository is still empty, it will not find any ReqView project files, and thus it displays the Select ReqView Project dialog. Just hit Cancel as we will create and save the actual ReqView project in the next step (this is the latest – ReqView 2.19 behavior. It may change a bit in a future version).
3. Initialize Git Repository:
To initialize the Git repository MIL-STD-498-DIDs with a project containing the first document:
-
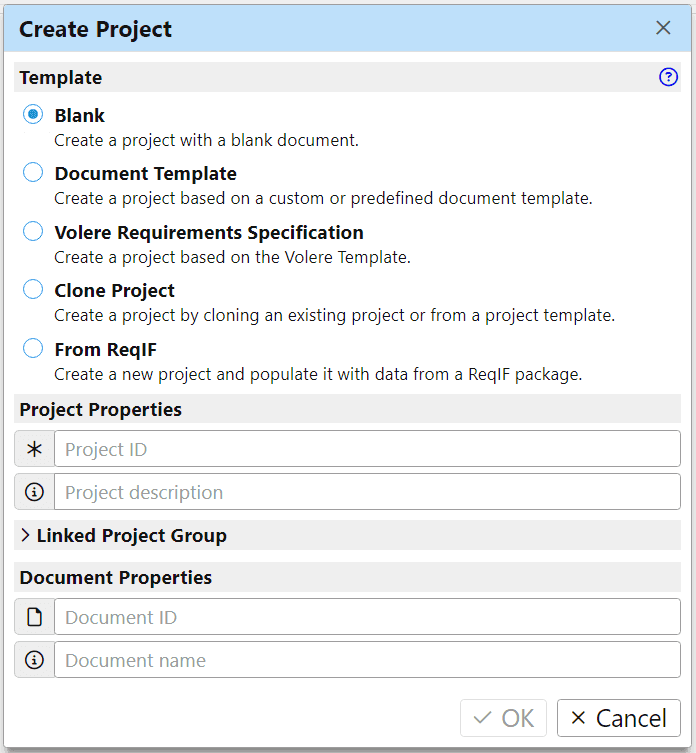
Select Project->Create Project from the main menu to open the Create Project dialog:
![Create Project dialog in ReqView Create Project dialog in ReqView]()
In the Create Project dialog, enter the following information:
- Choose Blank in the Template section.
- Enter “MIL-STD-498-DIDs” in the Project ID and “Data Item Descriptions (DIDs) for the MIL-STD-498 standard” in the Project description.
- Enter “BARE-TEMPLATE” in the Document ID and “Bare document template” in the Document name, which will be used for the first document in the project.
When all required parameters are filled hit OK.
-
Save the project into the Local Workspace and commit changes into the Git repository:
-
Select File->Save as Folder from the main menu to open the system Save As dialog and choose the directory MIL-STD-498-DIDs in the Local Workspace.
-
ReqView will display the Save Project As Folder dialog. Select OK to confirm the previously entered Project ID and the Save History option checked by default.
-
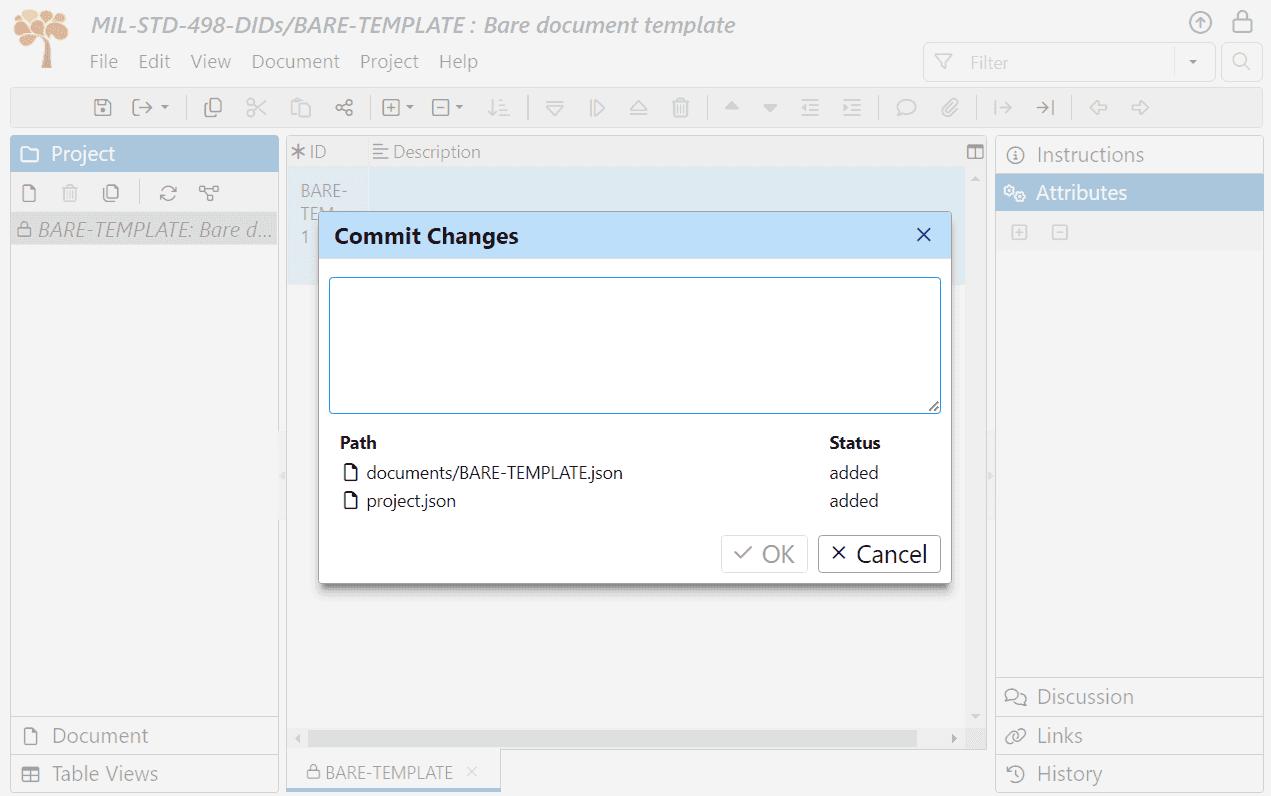
ReqView will display the Commit Changes dialog box. Fill in an appropriate commit message, like “Create project MIL-STD-498 with an empty bare document template”, and hit OK to commit and push changes to the global Git repository.
![Commit changes to Git dialog in ReqView Commit changes to Git dialog in ReqView]()
-
Create Bare Document Template
The project created in the previous section already contains the empty document BARE-TEMPLATE. The role of this document will be to hold custom attributes and table views common to all documents. We will use this document to create other document templates (the “template of the templates”).
Let us see how to define the custom attributes and table views that we chose to implement for MIL-STD-498 DIDs, as well as their rational and possible values. You may alter this list, and add or remove attributes and values, to best suit your development process.
1. Define Custom Attributes:
Custom attributes store additional information about requirements supporting your custom workflow. You can display attribute values in the Attributes pane or in table view columns.
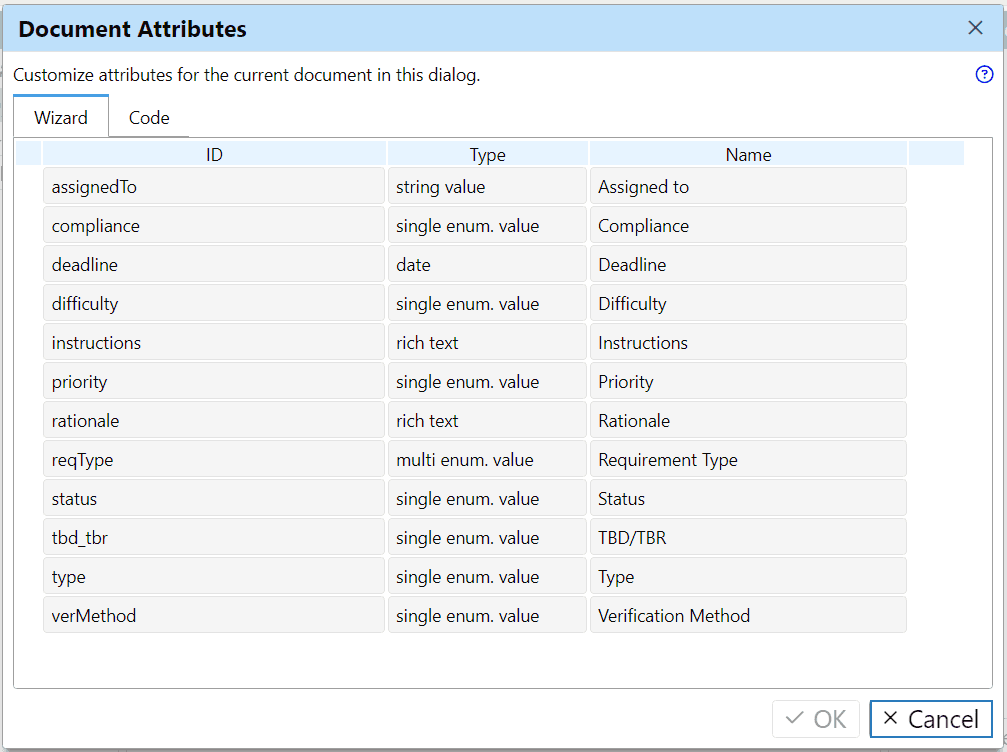
To define custom attributes, select Document->Customize Attributes from the main menu. ReqView will open the Documents Attributes dialog, in which you can either define attributes using a wizard or using JSON code. For further explanation see Customize Attributes.
When planning and editing attributes, you should take into consideration the following requirements and conventions:
-
The ID of an attribute should be unique among all the attribute IDs in the document.
-
The Name of an attribute is displayed as the attribute name in the Attributes pane, as the column header in the table view, as well as in exported documents, and as a filtering criteria. Choose a descriptive, self-documentary value for it.
-
The Key of an attribute enumeration value should be unique among all keys of the enumeration values of the given attribute.
-
The Label of an attribute enumeration value is displayed for selection when editing the attribute, in the table view, in printing the attribute value in exported documents, and as a filtering criterion. Choose a descriptive, self-documentary value for it.
In our BARE-TEMPLATE template, we will define the following custom attributes (common for all document templates based on the BARE-TEMPLATE document template):
-
Type (ID: “type”, Name: “Type”, Type: “single enum. value”): Describes the type of the current document object and enables export templates to control some aspects of the object printing. For example, show IDs of formal requirements only (and not for informal document content).
Its enumeration labels are: “Requirement”, “Figure Caption”, “Section”, and “Information”.
-
Requirement Type* (ID: “reqType”, Name: “Requirement Type”, Type: “multi enum. values”): Specifies the requirement type as a multi-value enumeration, since a single requirement can belong to multiple classes. For example, a requirement can be a Functional Requirement, as well as Safety Requirement.
Its enumeration labels are: “Functional Requirement”, “Non Functional Requirement”, “Interface Requirement”, “Safety Requirement”, “Security Requirement”, “Quality Requirement”, and “Regulatory Requirement”.
-
Rationale (ID: “rationale”, Name: “Rationale”, Type: “xhtml”): Describes the rationale of the requirement.
-
Verification Method (ID: “verMethod”, Name: “Verification Method”, Type: “multi enum. values”): Specifies the verification methods used, or that should be used, to verify this requirement. This is a multi-value enumeration since multiple verification methods may be required for some requirements.
Its enumeration labels are: “Analysis”, “Inspection”, “Demonstration”, “Test”, and “Special Qualification Method”.
-
Priority (ID: “priority”, Name: “Priority”, Type: “single enum. value”). Stores stakeholder's priority for implementing this requirement. Its enumeration labels are: “Low”, “Medium”, and “High”.
-
Expected Compliance (ID: “compliance”, Name: “Compliance”, Type: “single enum. value”). Stores our projection for the capability to comply with the requirement. Its enumeration labels are: “Comply”, “Partial Comply”, and “Non-Compliant”.
-
Difficulty (ID: “difficulty”, Name: “Difficulty”, Type: “single enum. value”). Stores our estimation of the difficulty and risk involved in complying/implementing this requirement. Its enumeration labels are: “Easy”, “Nominal”, and “Difficult”.
-
Status (ID: “status”, Name: “Status”, Type: “single enum. value”). Stores the development process status of the requirement. Its enumeration labels are: “Draft”, “Ready”, “Reviewed”, “Approved”, and “Released”.
-
TBD/TBR (ID: “tbd_tbr”, Name: “TBD/TBR”, Type: “single enum. value”). Stores the TBD status of the requirement. Its enumeration labels are: “TBD”, and “TBR”.
-
Assigned To (ID: “assignedTo”, Name: “Assigned To”, Type: “string”). Stores the person assigned to complete the requirement.
-
Deadline (ID: “deadline”, Name: “Deadline”, Type: “date”). Stores the deadline for progressing this requirement into the next Status towards being approved.
-
Instructions (ID: “instructions”, Name: “Instructions”, Type: “xhtml”). A special attribute that stores custom help text, which is displayed in the Instruction pane.
It has an additional boolean property help. When it is set to false, the attribute value is displayed in the table view as a regular attribute and the user can edit it. When it is set to true, contents is displayed on the Instructions pane and the attribute cannot be selected to display on the grid, nor can it be edited. For an example, see Project Workspace.
We will explain a simple workflow based on these attributes in the next chapter System Requirements Specification.
2. Define Table Views:
Table views help users to focus on a particular task during the project life-cycle or to select the document content for printing or exporting. Each table view stores a selection and visual configuration of table view columns, and the document filter. Other custom attributes are still available in the Attributes pane on the right.
You can manage table views in the Table Views pane easily, see Review Requirements Documents > Table Views.
In our BARE-TEMPLATE template, we will define the following task-oriented table views:
-
Primary: It is aimed at initial requirements editing. It displays columns ID, Type, Requirement Type, Description and Rationale.
-
Requirements Prioritization: It is aimed at requirements” prioritization and assessment with customers, like QFD. It displays columns ID, Type, Requirement Type, Description, Priority, Difficulty, Compliance, and Status.
-
Work Remaining: It is aimed at helping to manage the work remaining in order to complete the requirements. It displays the attributes ID, Type, Requirement Type, Description, Status, TBD/TBR, Assigned To and Deadline.
Note that you can alter these table views or add more table views to fit your workflow or needs later.
3. Finish Editing Document Template:
After completing the customization of the document template file, take the following steps to finish the editing:
-
Set the help property of the Instructions attribute to true so that ReqView displays instructions in the Instructions pane. To do that, first select Document->Customize Attributes from the main menu. In the Customize Attributes dialog, select the Code tab, scroll down the code, and set
help: truefor the instructions attribute. Finally, hit OK. -
Select Document->Finish Editing to save document changes and finish editing. If you've made any changes since the last commit, ReqView will ask you to enter a Git comment before it commits and pushes the changes to the remote Git repository MIL-STD-498-DIDs.
4. Publish Document Template File:
Now, it is time to publish the corresponding document template file to the global Templates Area.
For the Templates Area implemented as a global directory on a Shared Drive:
- Select File->Save as Template->Current Document to save the document as a document template file. In the OS specific Save as dialog, navigate to the global directory allocated for the document templates files, enter the template name “BARE-TEMPLATE.reqw”, and hit Save.
- In the Save as Document Template dialog, check Save table views option to to save the table views as part of the document template. Finally, hit OK.
For the Templates Area implemented as a clone of the global Git repository MIL-STD-498-Templates:
-
Select File->Save as Template->Current Document to save the document as a document template file. In the OS specific Save as dialog, navigate to the directory MIL-STD-498-Templates allocated to document template files, enter the template name “BARE-TEMPLATE.reqw”, and hit Save.
-
In the Save as Document Template dialog, check the Save table views option to save the table views as part of the document template. Finally, hit OK.
-
In the directory MIL-STD-498-Templates, run the following Git commands to commit your changes into the local Git repository and then push them to the global Git repository.
$ git add BARE-TEMPLATE.reqw$ git commit -m "Create bare document template"$ git push
Now, all ReqView users can pull changes from the MIL-STD-498-Templates Git repository, check out the document template file, and reuse it for creating new ReqView documents.
You can download the file BARE-TEMPLATE.reqw with the result.
Create Document Template for System Requirements
Our next step is to create a template for one of the very first documents written during project development — the system requirements specification.
Since we have chosen MIL-STD-498 as the documentation standard for our tutorial project, we will use MIL-STD-498 DIDs for the various documents as our document templates. The MIL-STD-498 DID describing system requirements is called System/Subsystem Specification (SSS).
MIL-STD-498 DIDs area freely available on the Internet in PDF, HTML, and MS Word formats. We will use MS Word for creating the corresponding ReqView document templates because it will serve best as a guideline for creating your ReqView document templates out of the templates you are already using or required to use. We will describe the process for the SSS DID, given in the file SSS-DID.doc.
Creating a document template out of an MS Word document (.docx, .doc) involves the following steps:
-
Prepare the DOCX file for import using MS Word.
-
Save the DOCX file as the HTML file.
-
Import the HTML file to a new ReqView document.
-
Finalize the imported document template in ReqView.
-
Publish the ReqView document template file.
While the following description of the required steps is somewhat detailed and lengthy, the process is quick and efficient. Converting an MS Word document into a ReqView document template takes about an hour, and importing a customer initiation document into ReqView is several hours of work. Naturally, the first one or two imports may take a bit longer.
Let us describe each step in detail. For more information about importing DOCX files to ReqView, see Import Requirements Specification From MS Word.
1. Prepare DOCX File for Import:
You can import into ReqView any document that you can open in Word for editing (including PDF files). However, you need to edit it in MS Word first:
-
Remove all unnecessary content — title page, TOC, page headers and footers, or informative text that is not needed.
-
Imported documents should have consistent section hierarchy as determined by heading paragraph styles (“Heading 1”, “Heading 2”, and so forth) because ReqView uses paragraph styles for reconstructing the document tree structure. Click View->Navigation Pane to open the Navigation pane and correct the hierarchy of document sections displayed in the Headings tab. Typical examples of inconsistent hierarchy are a “Heading 2” paragraph without the parent “Heading 1” paragraph, or a “Heading 1” paragraph followed by a “Heading 3” paragraph without a “Heading 2” paragraph in between.
Also, a document may have a hierarchy embedded in regular text paragraphs instead of using heading paragraph styles. While ReqView can easily import such a document, it will be without hierarchy. Add the required hierarchy in MS Word before import (by marking the relevant parts using the corresponding “Heading” style) because it is easier than fixing the document hierarchy in ReqView later.
-
Click Home->Numbering->None to disable the numbering of section headings because ReqView numbers sections automatically.
-
Fix custom styles not supported by ReqView:
-
All text paragraphs and tables must use the default “Normal” style.
-
All bulleted or numbered lists (including multilevel) must use the default “List Paragraph” style based on the “Normal” style.
-
All list items must have the item marker (bullet, number, letter, etc.).
-
-
Tables in the imported document are imported as tables into ReqView, resulting in a single ReqView object for the whole table. Thus, requirements in the imported document must not have a table layout (since we will later need each requirement to be a different ReqView object). Click Layout->Convert to Text to convert the selected table with requirements to text paragraphs.
-
Remove all blank lines because they will result in empty ReqView document objects when imported.
Let us see the concrete steps to prepare the file SSS-DID.doc for import into ReqView:
-
We delete the table on the first page — it is not required in the ReqView SSS document template.
-
We delete all the general instructions up to “1. Scope”. These preparation instructions are general to all MIL-STD-498, guide the tailoring and editing process, and are not required in each template.
-
We remove page headers and footers (not mandatory).
-
We examine the document section hierarchy and find out that the document has a hierarchy, but this hierarchy is not reflected in heading styles. Thus, we edit every paragraph, delete the heading number, split the rest of the paragraph after the heading (i.e. after “Scope” for the first line), and mark the headline by the right style (i.e. “Heading 1” for “Scope”, “Heading 2” for “Identification”, etc.).
-
We see that lists in paragraphs 3.3.x (multi-level list), 3.12, and 4 are also not reflected in styles. Thus, we convert these lists to MS Word lists and then delete the list prefix that was embedded in the text of the original document.
-
We remove all blank lines.
You can download the file SSS-DID.docx with the result.
2. Save Filtered HTML File:
To save the Word document for import to ReqView, click File->Save As, select “Web Page, Filtered (*.htm, *.html)” as the file format, then click More options->Tools->Web Options and choose “Unicode (UTF-8)” encoding in the Encoding tab, and “PNG as the graphic format” in the Browsers tab. Finally, hit Save to save a file with the original name and .htm extension.
If the saved file contains any images they will be placed as PNG files in a directory named as the file without the extension and with suffix “_files”. Please do not use spaces in the file name to avoid problems when importing the file to ReqView.
You can download the file SSS-DID.htm with the result.
3. Import HTML File to ReqView:
This is a simple two-step process:
-
In the MIL-STD-498-DIDs project, create a new document called SSS-DID and base it on the BARE-TEMPLATE to inherit all the custom attributes and table views we have created.
-
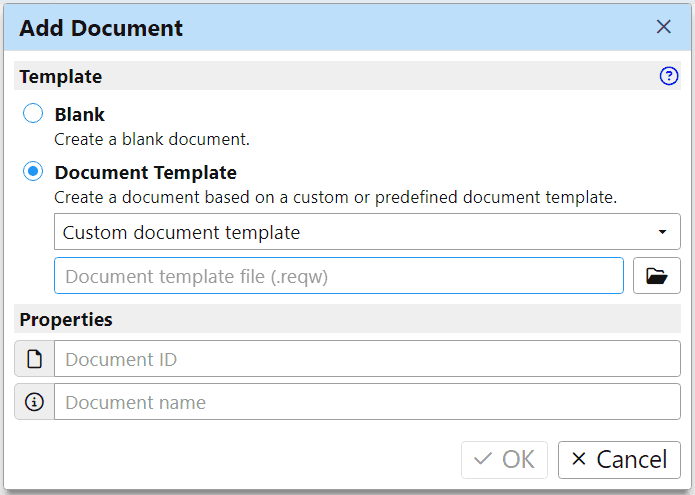
Select Project->Add Document from the main menu to open the Add Document dialog.
-
Select “Custom document template” and pick the BARE-TEMPLATE.reqw from the local directory MIL-STD-498-Templates.
![Create a document from a custom document template in ReqView Create a document from a custom document template in ReqView]()
-
Enter “SSS-DID” in the Document ID and “MIL-STD-498 SSS DID Document Template” in the Document name fields.
-
-
Import the SSS-DID.htm file into the new ReqView document SSS-DID you have just created:
-
Select File->Import->Word HTML File->Add After from the main menu while the first document object SSS-DID-1 is focused.
-
In the Import Word HTML, select the SSS-DID.htm file in the Word HTML file field.
-
If the imported file contains images, select the image files in the Image files field. Because there are no images in the SSS-DID document leave this field empty now.
-
4. Finalize Document Template in ReqView:
Now, it is time to transform the imported SSS-DID document into a document template. This involves taking the following steps:
-
The initial document object SSS-DID-1 is not needed. To delete this object, focus it in the table view and select Edit->Delete Objects from the main menu.
-
Move all guidance text into the Instructions attribute of the corresponding parent section. This is done in the following way:
-
To enable editing of the Instructions attribute in the table view, set the help property of the Instructions attribute to false. First, select Document->Customize Attributes from the main menu. In the Customize Attributes dialog, select the Code tab, scroll down the code, and set
help: falsefor the instructions attribute. Finally, hit OK. -
To show the Instructions attribute in the table view, select View->Show Columns from the main menu, and check the Instructions attribute.
-
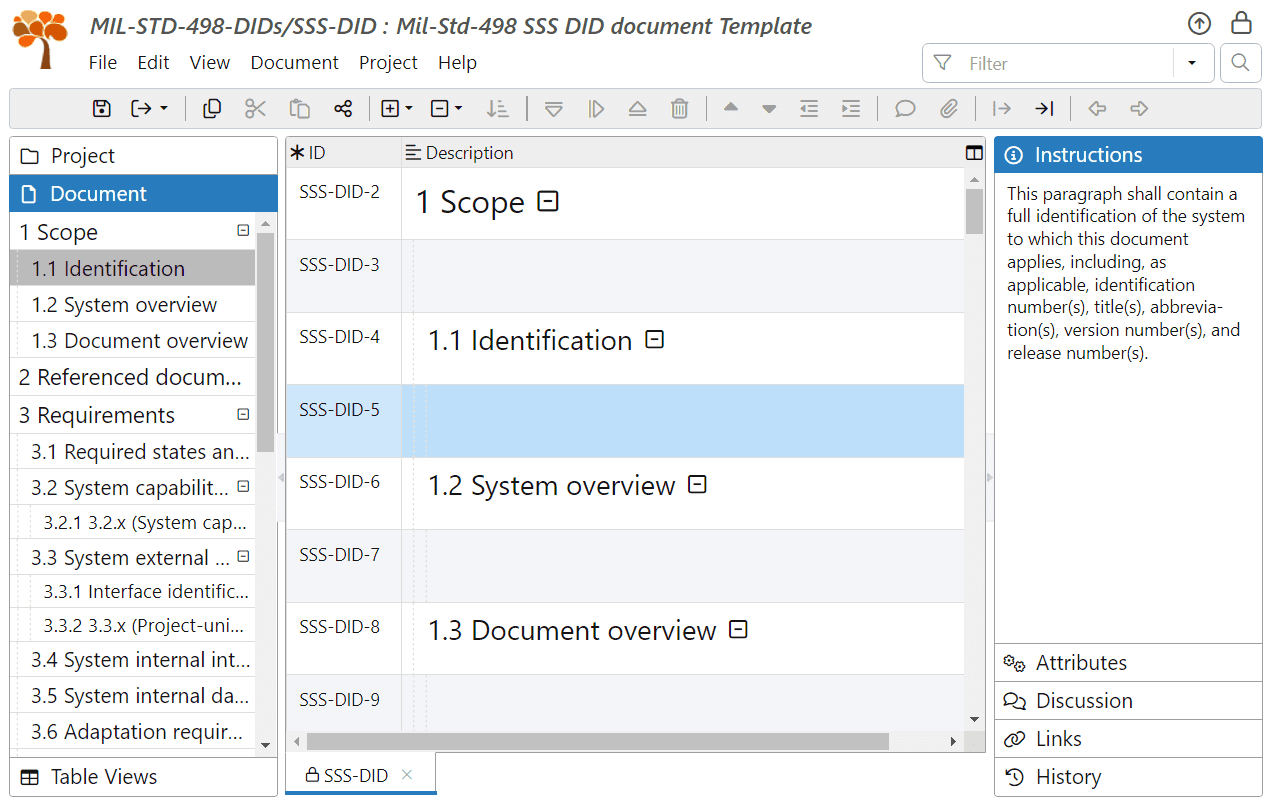
For each non-heading document object with a guidance text, double click the Description column, select and cut the guidance text. Then, paste the text into the Instruction attribute of the parent section heading object. For example, move content from the Description column for object SSS-DID-3 object into the Instructions column of row SSS-DID-2.
-
Use the same procedure as in Step 1 to set the help property of the Instructions attribute back to true. Guidance text for each selected section is displayed in the Instructions pane now.
-
-
MIL-STD-498 standard requires that all document sections should be preserved, even in the case that a specific section is not relevant or needed for your project. In such a case, a clear explanation about that should be made. Thus, we will leave the empty document objects remaining after copying the guidance text into the Instructions attribute of the corresponding parent section, to be later filled by the document writer.
-
The import of paragraph 5 created two document objects SSS-DID-67 and SSS-DID-68 instead of one. This happens if the imported text description has more paragraphs. To merge these two objects, select them in the table view, then select Edit->Merge Objects from the main menu.
-
Make any changes you would like that suit your specific needs. For example, provide fixed contents for object SSS-DID-65 in Section 4. “Qualification Provisions”, since we use attribute Verification Method to specify the verification method for each requirement. Or, change the numbering scheme of document appendixes (see Instructions of object SSS-DID-71).
-
To permanently remove all document objects deleted during editing, select Edit->Purge Objects->Purge All from the main menu.
-
When done, select Document->Finish Editing Document from the main menu, and enter a commit message, like “First release of the MIL-STD-498 SSS DID”.
Our document SSS-DID looks like this now:
5. Publish Document Template File:
Follow the procedure described in Section Create Bare Document Template > 4. Publish Document Template File to publish the document template file SSS-DID.reqw in the Templates Area.
Customize Traceability Links
A ReqView Traceability Link is a named, directed relation between ReqView document objects. The Link Type defines the relation between connected objects, which can represent different project artifacts. For example:
| Link Type | Relation Description |
|---|---|
| Satisfaction | Leads from a low-level requirement to its source upper-level requirement from which it was derived. An upper-level requirement is a requirement that is defined at an upper-level document either in the “V” model or in the project hierarchy. |
| Verification | Leads from a test/verification in the test/verification plan and test description to the verified requirement. |
| Implementation | Leads from a component, functionality, or requirement to the implemented upper-level requirement. |
| Mitigation | Leads from a risk reduction object in the risk management plan to an object (describing a requirement or designed implementation) at risk. |
| Reference | Leads from an object that references another object in the project hierarchy and that this reference has a value for project documentation. |
Traceability links play a pivotal role in the contribution of ReqView to project management and implementation practices, enabling users to perform completeness checks, and sanity checks, to conduct “what-if” scenarios as part of requirements change assessment, and much more. See Requirements Traceability Links for more information.
We have already mentioned that ReqView data is organized into projects. ReqView projects store the configuration of traceability links. A responsible user (typically the Chief System Engineer) can edit the traceability links by selecting Project->Project Traceability... from the main menu, see Configure Project Traceability.
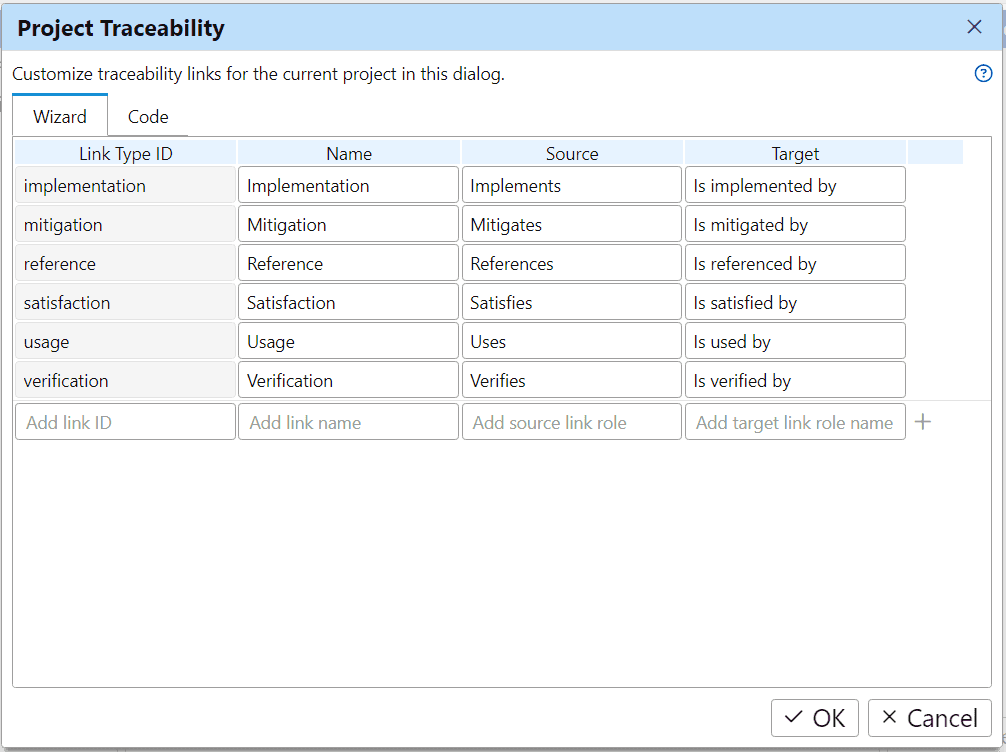
ReqView data for small real-life projects (about 10-20 documents) can be conveniently organized in a single ReqView project. Bigger real-life projects are usually divided into several ReqView sub-projects. ReqView projects can linked to each other, creating a project hierarchy or a project tree, see Linked Projects for more information.
You can create ReqView traceability links between document objects stored in two connected ReqView projects, however, you need to define the same traceability link types in both projects. Using the same project templates when creating the user ReqView projects implements this automatically. You can also copy the Link Type Definition between projects using the Code tab of the Project Traceability dialog.
As a part of this tutorial, we provide a project template file that includes the definition of the above traceability link types. You can use it when creating your ReqView projects. If your project management methodology needs more, or other, link types, you can edit the link types in the project template, or directly in your projects.
You can download the file PROJECT.reqw with the template project.
In the next Chapter 5, we will import stakeholder requirements for the UNEX project and process them as a verifiable base for system requirements.
