ReqView Beta 2.2.0 M3 — Suspect Links
We have released beta of Suspect Links feature which will help you with tracking changes of linked requirements. It also allows reordering of documents in the project and simplifies roundtrip updates via CSV files.
Suspect Flag for Traceability Links
One of usual requirements management challenges is tracking changes in linked objects. Assume for instance that our project stores high level user needs in a NEEDS document, requirements specification in a SRS document and that SRS requirements are linked by satisfaction links to the corresponding high level NEEDS. How can the author of the SRS document track changes in the NEEDS document to keep SRS document updated?
Suspect Links feature helps in this usecase by propagating changes of high level objects to the downstream linked objects. In short, any change in a user need (the satisfaction link target) becomes visible as a link suspect flag the linked SRS requirements (where the satisfaction links start). The suspect flags notify author of the SRS document that he should update the linked SRS objects. Then he can clear the link suspect flags to be notified about the future changes.
Following steps explain how to use Suspect Links feature in more details:
-
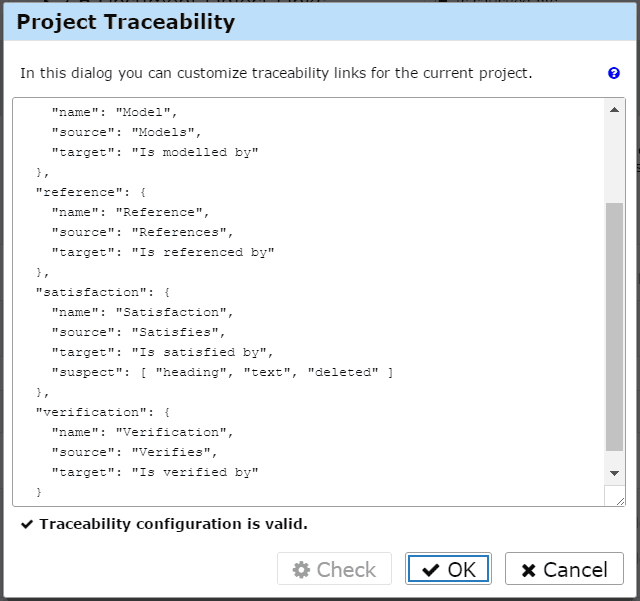
In the Project Traceability dialog configure link type suspect attributes for which you want to track changes in the link target object. For instance, for satisfaction links you may want to track suspect links only in text attribute which usually contains full requirement description, in heading attribute storing the header text and in deleted attribute marking objects as deleted:
![Traceability configuration of suspect links Traceability configuration of suspect links]()
However you can track changes also in other custom attributes, such as object status, acceptance test, etc.
-
If you change a NEEDS object then the application will show the Links column or Links right pane for each satisfaction link icon which denotes that the link is suspect.
-
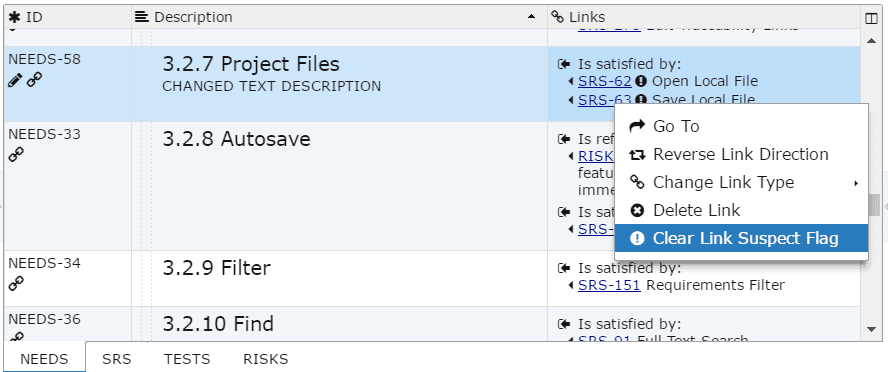
You can clear a suspect link flag by choosing Clear Suspect Link Flag from the context menu opened on mouse right click:
![Clear suspect link flag Clear suspect link flag]()
The suspect link flag icon for the cleared link will disappear and it will be shown again only after you change the link target object again.
-
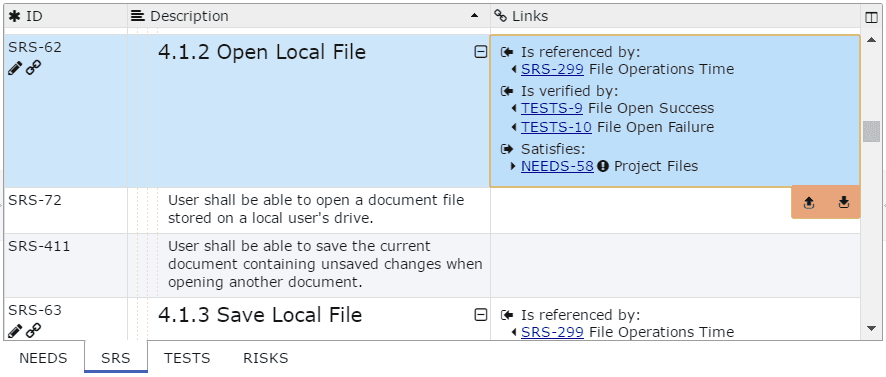
You can review SRS requirements linked to the changed upstream user needs (in heading, text or deleted attribute) by following links with suspect flag icon :
![Suspect link flag Suspect link flag]()
-
You can select more reviewed SRS objects and clear suspect flags of all outgoing links by menu Edit > Clear Suspect Flag or CtrlJ shortcut.
Reorder Documents
The previous ReqView versions displayed project documents in the order of document IDs. You can now change order of documents by drag and drop of document tabs.
If the project was opened from a Project File then the new order is saved by File > Save menu or CtrlS shortcut.
If the project was opened from a Project Folder then you can reorder project documents only if no (other) user keeps project lock (e.g. during editing Project Traceability) or keeps an exclusive document edit lock. The new order is immediately saved into the Project Folder so that other users can refresh it by Project > Refresh Project menu or by CtrlR shortcut.
Update Document from CSV
In the previous version you could import new document objects from and update the existing object only from separate CSV files. We have simplified roundtrip updates via CSV files — you can import new objects and update existing objects from a single CSV file.
For instance, you can use following workflow to import new objects from CSV file, keep information about the object source and the import state:
-
In the exported document create custom attribute importSource (string) storing to the name of the CSV file from which the object was initially imported and importState storing import state value, e.g. "New" for new objects.
-
Export the document into CSV (File > Export > CSV File).
-
Open the exported CSV file in MS Excel and remove section, level and attributes columns.
-
Provide the CSV file to a reviewer who can change existing objects or add new rows with empty id describing new objects.
-
Import the updated CSV file back into the original ReqView document by File > Import > CSV File > Update Document menu. New objects (without IDs) will be placed as a flat list at the end of the document and they will get automatically a unique ID.
-
Change importSource attribute of the new objects to the name of the CSV file used for import. After you move each new object to the right place change value of importState attribute to "Acknowledged". You can also select all the new objects and change value of custom attributes importSource and importState for all of them at once. The history contains change records for attributes importSource and importState providing more information who imported each new object, when and from which CSV file.
-
You can mark unwanted new objects as deleted and purge them permanently from the document.


