You can connect ReqView with Atlassian Jira Cloud to benefit from an integrated Application Lifecycle Management (ALM) solution.
- With ReqView, you can manage stakeholder requirements, system requirements, low-level HW/SW requirements, risks, validation and verification (V&V) information. This data is organized into structured documents and linked, enabling easy review and tracing of related requirements.
- With Jira, you can manage the SW development using an agile or traditional SW development process. Optionally, you might manage SW tests and their execution in Jira using a Jira plugin.

Note: ReqView supports integration with Jira team-managed (next-gen) and company-managed (classic) projects created using Scrum or Kanban templates from the Software development category.
Workflow
With ReqView and Jira integration, you can follow this workflow:
- Capture Requirements: Manage and trace requirements across the V-model in ReqView. Capture detailed low-level requirements for a HW/SW subsystem.
- Export Requirements: Export a baseline of low-level requirements document from ReqView into a Jira project to share them with the development team. Trace requirements between ReqView and Jira work items in both directions.
- Manage SW Development: Manage SW development in Jira using an agile development process:
- Decompose user stories to tasks.
- Plan user stories and tasks using the Jira field Sprint.
- Assign user stories and tasks to developers using the Jira field Assignee.
- Track the development progress of user stories using the Jira field Status.
- Test Management (optional): Manage test cases verifying user stories and capture test execution results in Jira Cloud.
- Describe test cases.
- Link test cases with user stories.
- Plan test cases for execution.
- Execute test plans and capture test results.
- Create defects describing failed tests.
- Update From Jira: Fetch information about the development status of exported Jira work items in the source ReqView document to display it in a Requirements Traceability Matrix (RTM).
Set up Jira Integration
Follow these steps to set up ReqView and Jira integration:
- Install the ReqView Connector in Jira.
- Enable Jira integration in ReqView.
- Configure export of documents from ReqView to Jira.
- Manage Jira credentials for ReqView.
- Manage Jira project permissions.
Install ReqView Connector for Jira
To make the integration between ReqView and Jira easier, we have created a new Atlassian Marketplace application ReqView Requirements Management Connector for Jira:
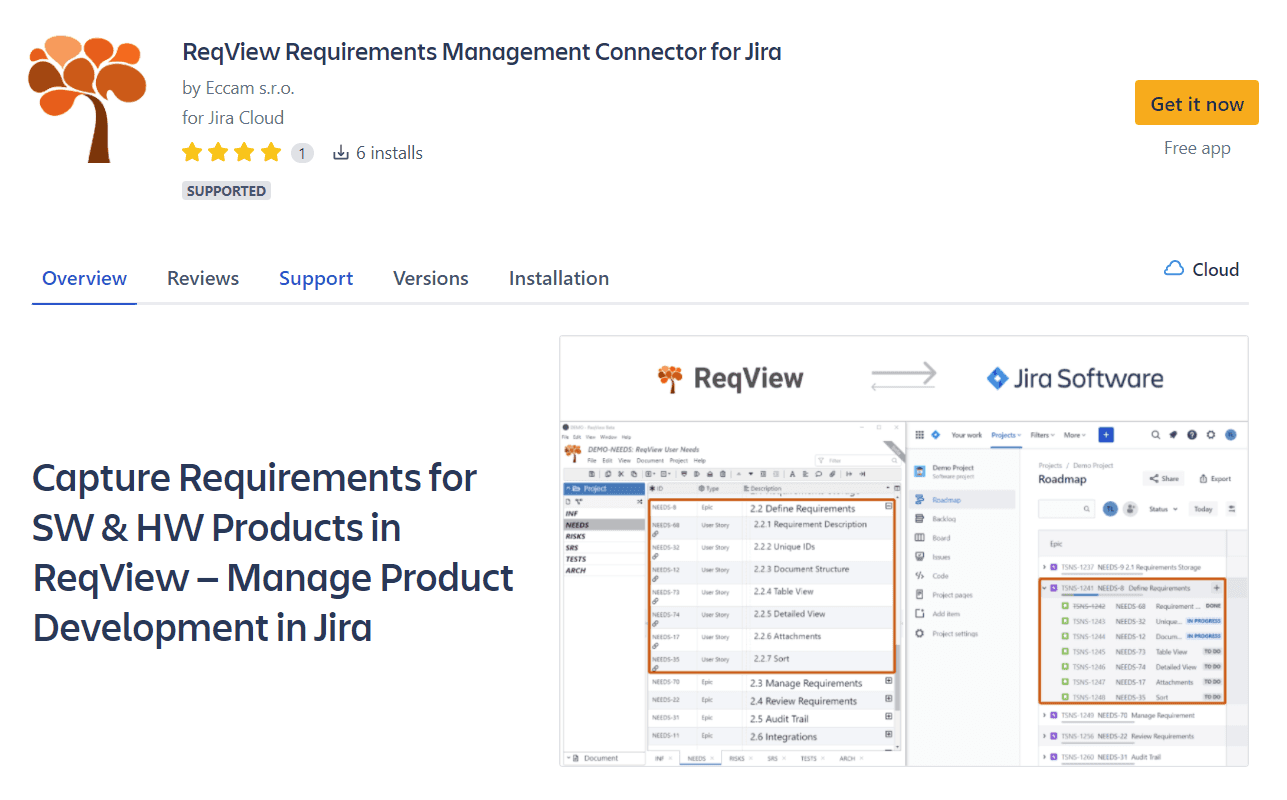
We recommend installing this application because it enables some features (such as tracing ReqView requirements from Jira work items) and improves the performance of requirements synchronization between ReqView and Jira. On the other hand, you do not need this application for testing the basic functionality of the integration.
To install this application:
- Log into your Jira Cloud instance (as an administrator).
- Click Apps and choose Find new apps in the top bar.
- Search for “reqview” in the Atlassian Marketplace and click ReqView Requirements Management Connector for Jira result.
- Click Get app in the app details screen.
Enable Jira Integration
To enable Jira integration in ReqView, click Edit, select Preferences, and tick Integrate with Jira.
Configure Export to Jira
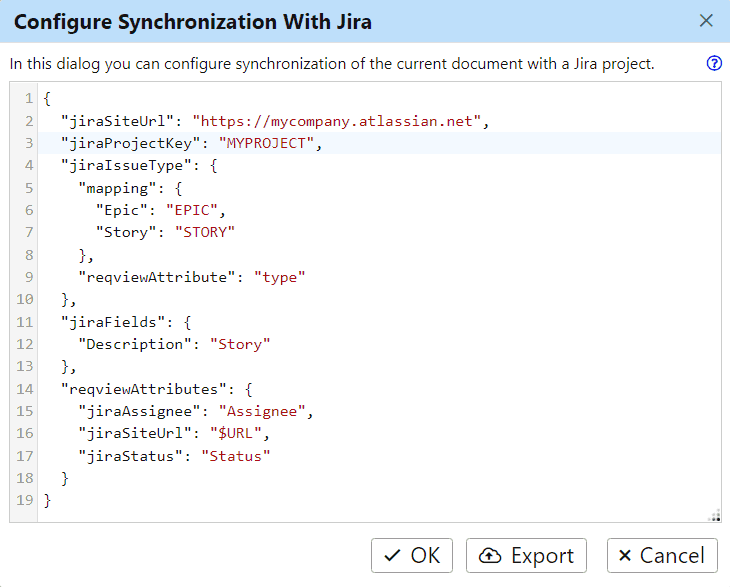
To configure export of requirements from ReqView to Jira, select a document storing requirements, click File, select Jira and then Configure Synchronization. In the Configure Synchronization With Jira dialog update the configuration in JSON format:
Configuration Properties:
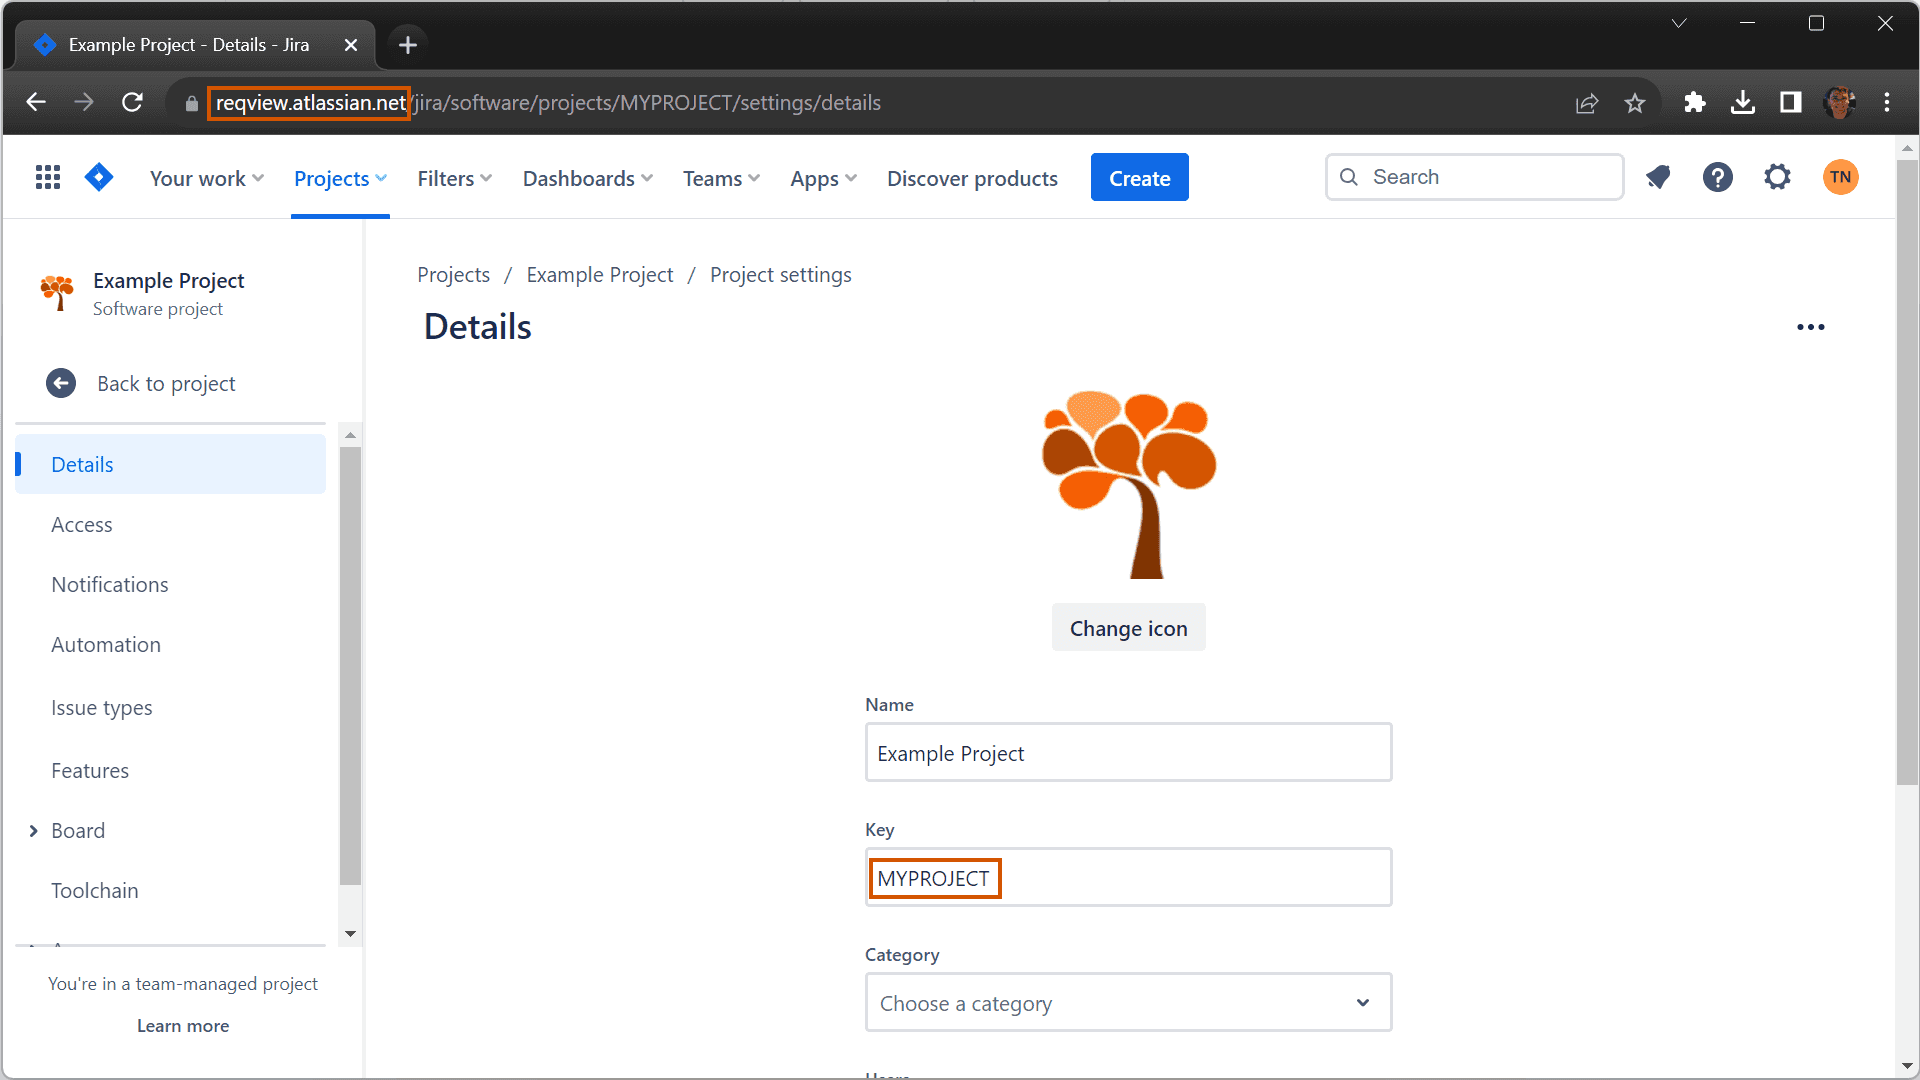
jiraSiteUrl– the URL of your Jira site. To get the value, open your Jira project in a web browser and copy the URL with the domain name only (e.g., “https://MYCOMPANY.atlassian.net”).jiraProjectKey– the key of your Jira project. To get the value, open the list of all projects in Jira and copy the Key of the target project (e.g., “MYPROJECT”).jiraIssueType– the mapping of ReqView document objects to Jira work types.reqviewAttribute– the ReqView custom attribute describing the type of document objects (e.g., “type”).mapping– the JSON object describing how to set Jira work types according to the type of ReqView documents objects.- key – Jira work type (e.g., “Epic” or “Story”).
- value – the type value of the ReqView custom attribute set in the configuration property
reqviewAttribute(e.g., “EPIC” or “STORY”).
jiraFields(optional) – the JSON object describing how to set Jira fields, see Export Requirements to Jira.- key – the target Jira field. Note that only “Description” and “Summary” values are supported now.
- value – the source ReqView attribute or template column (e.g., “text”).
reqviewAttributes(optional) – the JSON object describing how the integration sets ReqView custom attributes from Jira work items. See section Update Requirements From Jira below.- key – the target ReqView custom attribute (e.g., “jiraStatus”).
- value – the source information fetched from Jira:
- the name of a Jira field (e.g., “Status”)
$URLstring to fetch the URL of the Jira work item$LinkedIssues(<issue_type>)string to fetch URLs of linked Jira work items of a given type (e.g., “$LinkedIssues(Test)”)$Links(<link_type>)string to fetch a list of URLs of Jira work items linked by a given link type (e.g., “$Links(is tested by)”)
exportAttachments(optional) –truestring to export attachments from ReqView to Jira.
Notes:
- Depending on the template used for Jira project, map requirements to the following Jira work types:
- Scrum: Epic, Story, and Task
- Kanban: Epic and Task
- Jira supports basic Epic > User Story > Sub-task and Epic > Task > Sub-task hierarchy. However, ReqView does not support sub-tasks to avoid potential consistency issues during synchronization, as Jira handles them differently than User Stories and Tasks.
- Jira allows only parent-child relationships between certain work types (e.g., a Story can be created in an Epic; however, a Story cannot be created in a Task).
- Jira fields and their values should be specified in English.
Example: Open the Example Project and configure the Jira integration to export epics and user stories from the document NEEDS to your Scrum project hosted at Jira Cloud.
-
In the Jira cloud, find the URL of your Jira project in the browser address bar and the key of your Jira project key in the Project Settings > Details screen:
![Jira Project URL and Key Jira Project URL and Key]()
-
In ReqView, configure the document NEEDS for export to Jira. First, open the document NEEDS and select File > Jira > Configure Synchronization from the menu, and enter the following configuration the Configure Synchronization With Jira dialog:
{"action": "export","jiraSiteUrl": "https://MYCOMPANY.atlassian.net","jiraProjectKey": "MYPROJECT","jiraIssueType": {"mapping": {"Epic": "EPIC","Story": "STORY"},"reqviewAttribute": "type"},"jiraFields": {"Description": "Story"}}Then, set the configuration property
jiraSiteUrlto the URL of your Jira project and the configuration propertyjiraProjectKeyto the key of your project.Note that:
-
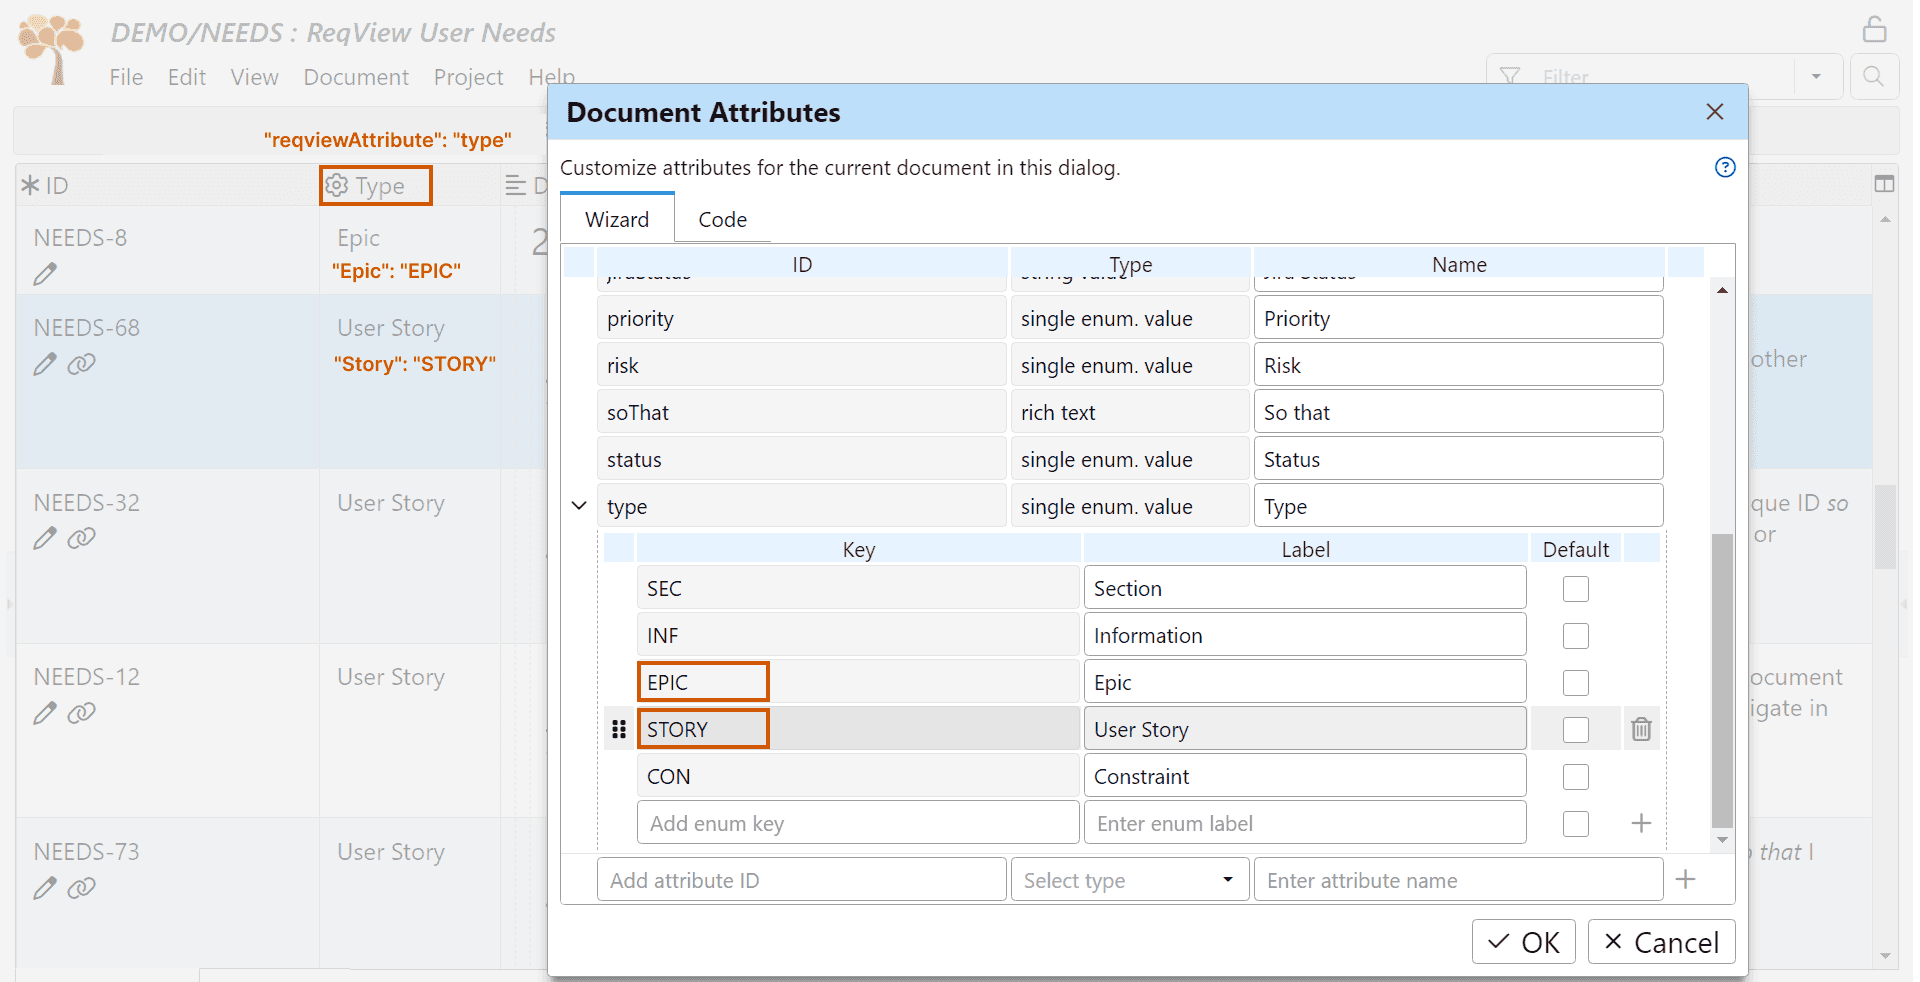
The configuration property
jiraIssueType.reqviewAttributeis set to “type” because ReqView document NEEDS defines custom enumeration attribute type to describe the type of document objects, see also Customize Attributes.![Export epic and story rows Export epic and story rows]()
-
The configuration property
jiraIssueType.mappingis set to create Jira work items as follows:- Each ReqView document object with the attribute type equal to “EPIC” is exported to an Epic work item in Jira.
- Each ReqView document object with the attribute type equal to “STORY” is exported to a Story work item in Jira.
- Other document objects are not exported.
-
The configuration property
jiraFieldsis set to export the Jira field Description from the ReqView template column Story.-
Display of template column Story for the source document in ReqView:
![Display of the template column Story in ReqView Display of the template column Story in ReqView]()
-
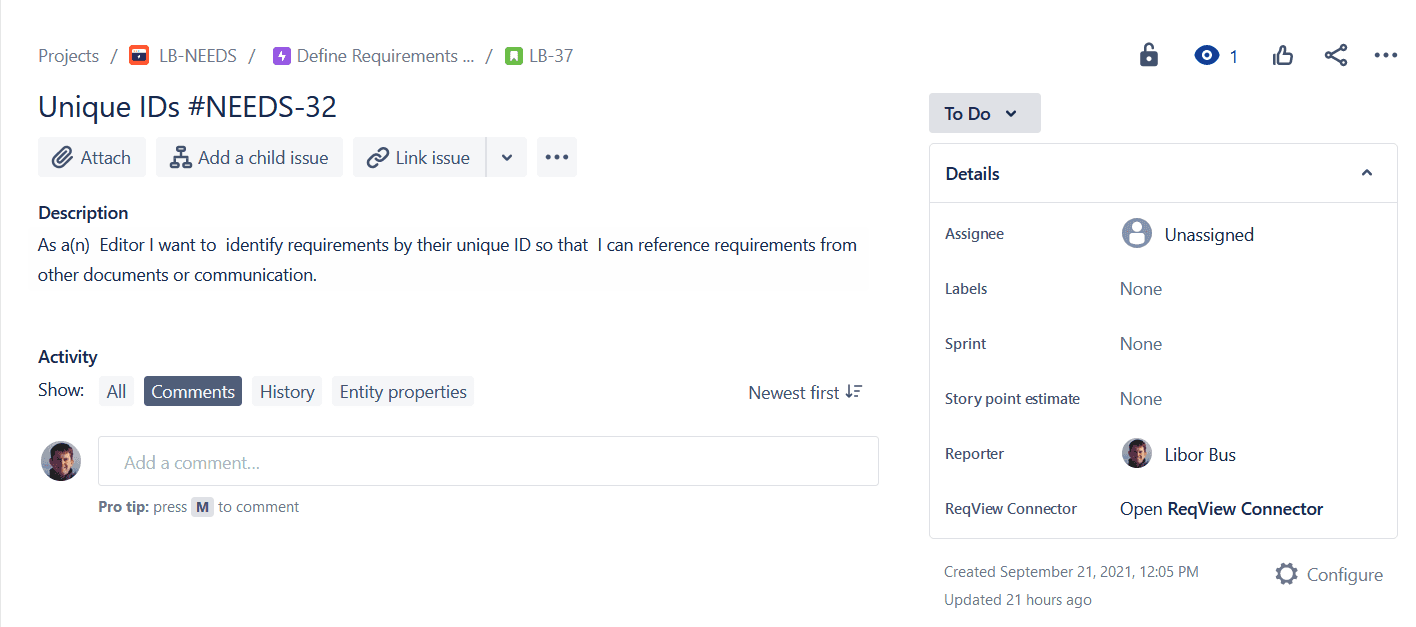
Display of a target Jira work item:
![Detailed view of a Jira work item exported from ReqView Detailed view of a Jira work item exported from ReqView]()
-
-
Manage Jira Credentials
For security reasons, ReqView uses Jira API tokens to access Jira projects (not passwords). You need to create your private API token in Jira Cloud API Tokens screen:
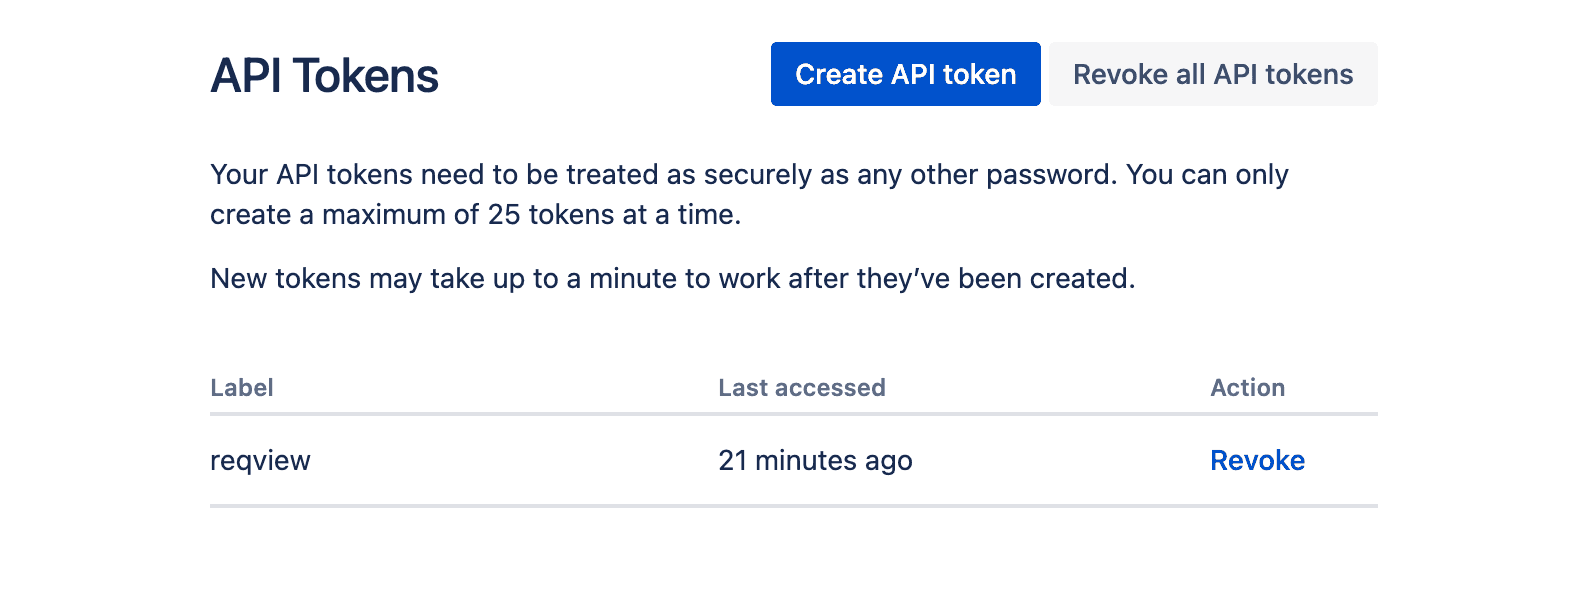
See Manage API tokens for your Atlassian account for more information.
When ReqView connects to your Jira Cloud site the first time, you can enter your Jira login email and API token in the Jira Credentials dialog:
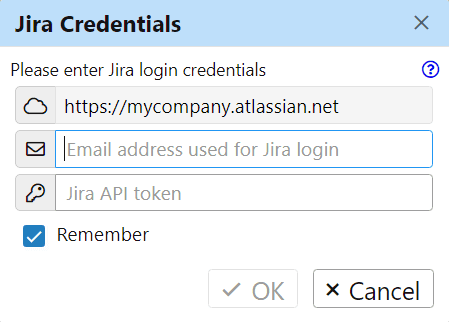
Tick Remember checkbox to save the Jira credentials securely.
To erase saved Jira credentials any time, click File select Jira, and then Clear Credentials.
Note: If Jira Cloud returns error “Jira project was not found” then please double check if:
- the configuration property
jiraSiteUrlis set to your Jira project URL, - the configuration property
jiraProjectKeyis set to your Jira project ID, - the entered API token is assigned to your Jira login email (is not assigned to another Jira user), and
- the entered API token is valid (not revoked).

Manage Jira Permissions
Default Access:
When using the default settings of Jira projects, you don't need to do anything. You can synchronize data right away.
When your project has more complex user access settings, please check that editors who will synchronize data have adequate permissions. The settings differ for company-managed and team-managed projects.
Custom Access for Team-Managed Projects:
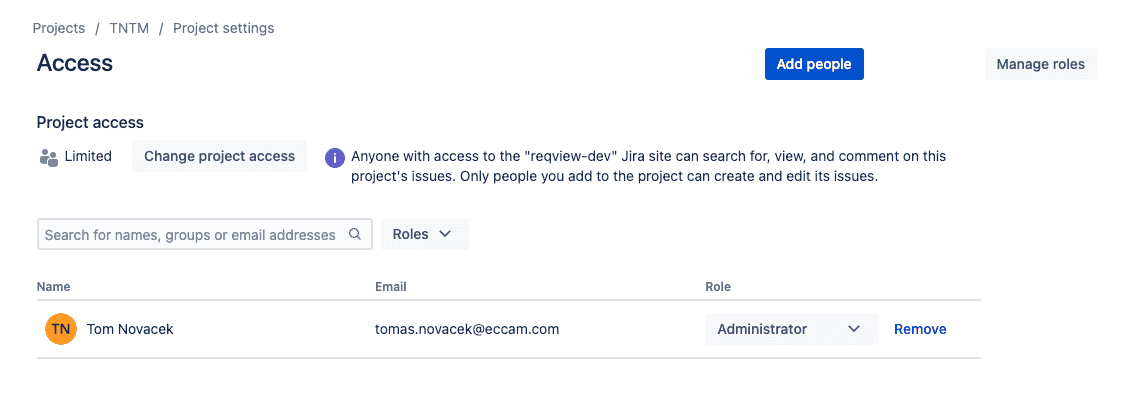
For team-managed projects, set the “Product role” of users to “Product admin” (Settings > User Management, three dots at the selected user > Show details) or assign users “Administrator role” for the selected project (Project Settings > Access).
Custom Access for Company-Managed Projects:
In company-managed projects, minimal users' permissions for synchronizing ReqView with Jira are “Create Issue”, “Edit Issue” and “Administer Project” (e.g., Jira Settings > Work items > Permission schemes, Permissions).
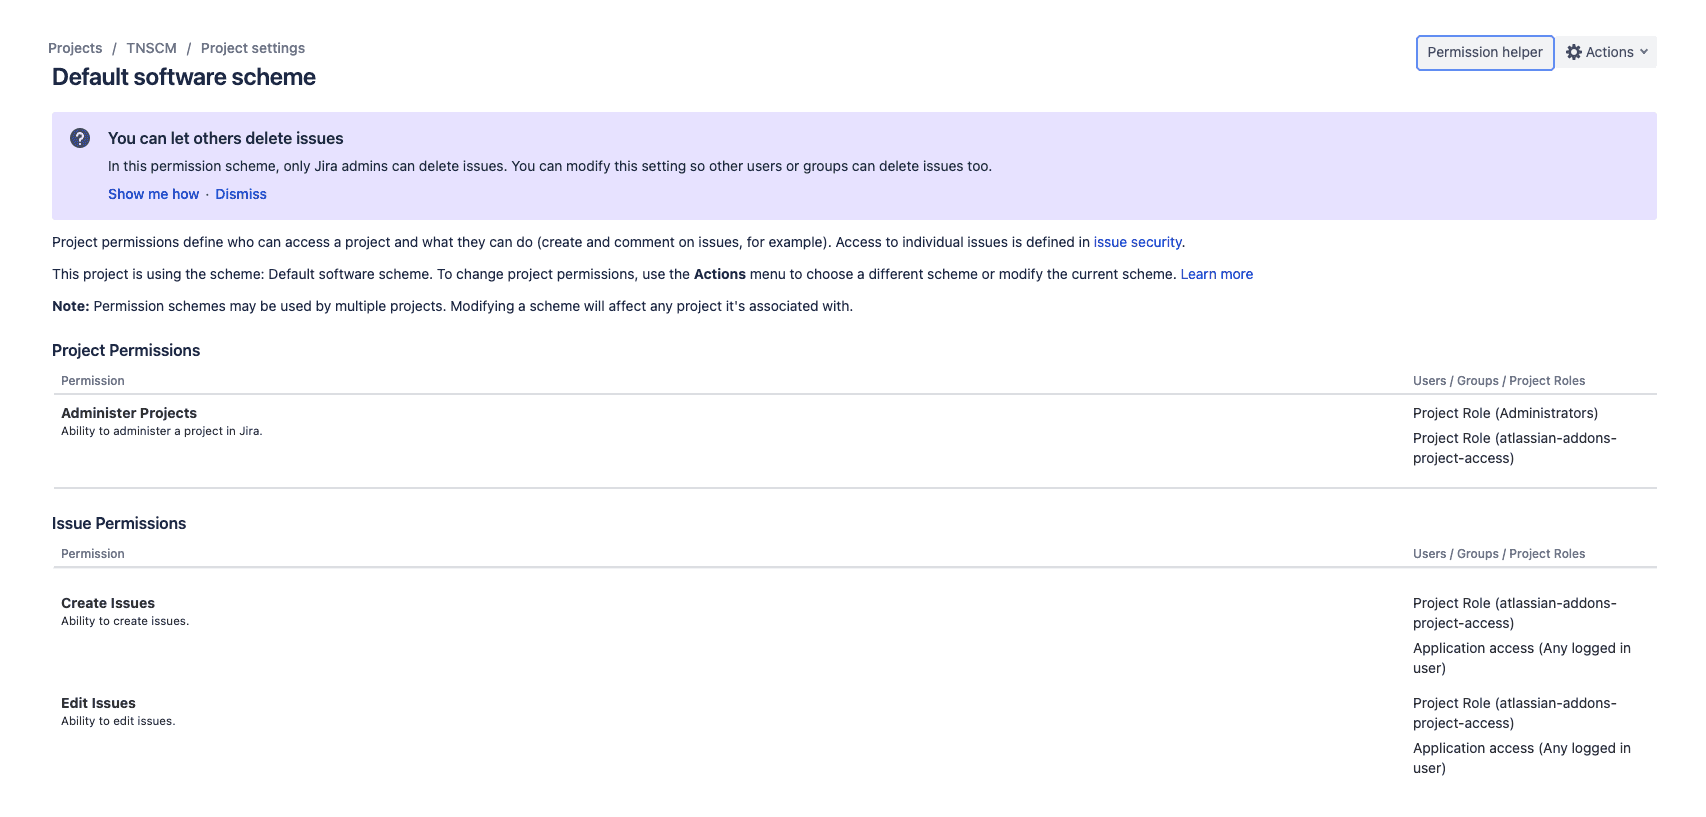
Note: If Jira Cloud returns error “You cannot edit the configuration of this project” then check if you have project permission Administer Projects.
Export to Jira
To export requirements from ReqView to Jira, open the exported document, click File, select Jira, and then Export Document. The integration iterates the document and creates new Jira work items or updates already exported work items according to the Export Configuration:
- Work Type – is based on the type of source document objects in ReqView as defined by the configuration property
jiraIssueType(e.g., Epic or Story work items). - Hierarchy – Jira work items have the parent-child relationship set according to hierarchy of source ReqView document objects (e.g., Epic work items are the parent of Story work items).
- Summary field – is set to the value of attributes heading and id of the source requirement. Optionally, you can adjust the configuration property
jiraFieldsto use a custom attribute or a template column instead. - Description field – is set to the value of text attribute of the source requirement. Optionally, you can adjust the configuration property
jiraFieldsto use a custom attribute or a template column instead.
ReqView is the source of truth of this information in the exported Jira work items. Jira users should not change it because ReqView will overwrite it in the next export. However, Jira users can update other Jira fields (e.g., Status, Assignee, or Sprint) as needed to manage the development of requirements in Jira.
You can repeat the export of requirements to Jira for each updated version of the source document. ReqView will update Jira work items created earlier or create work items for new requirements added since the last export. ReqView will mark Jira work items corresponding to requirements deleted (or purged) in ReqView as deleted in Jira using “[Deleted]” prefix in the work item Summary. You can query such work items based on the prefix to permanently remove them in Jira.
You can navigate from Jira to ReqView if you install the ReqView Connector for Jira. To navigate from a Jira work item to the corresponding requirement in ReqView, open the Jira work item in browser, click Open ReqView Connector in the Details right side pane, and click Open in ReqView. In the Choose application to open the reqview link dialog, select ReqView application, optionally tick Always use this application to open reqview links, and finally click Open Link. For more information about ReqView URL links, see Share URL Links.
Update From Jira
You can fetch information about exported Jira work items (e.g., work item URL, status, assignee, sprint, release versions) to the original document in ReqView and display this information in table views for review or coverage analysis purposes.
The information fetched from Jira is stored in custom attributes of the exported document. We recommend that you define attributes for storing Jira information as follows:
external: trueto avoid saving attribute values in the Project File or Project Folder.readOnly: trueto disable editing of attribute values by users.
To configure information fetched from Jira during export, set the configuration property reqviewAttributes, see Configure Export to Jira.
To navigate from a ReqView requirement to the corresponding Jira work item by clicking on URL links, define a custom xhtml attribute and map this attribute to “$URL” in the configuration property reqviewAttributes.
To fetch information from Jira without updating Jira work items, open the exported document in ReqView, click File, select Jira and then Update Document. When the document is editable then ReqView updates all attributes listed in the configuration property reqviewAttributes. Otherwise, ReqView fetches only values of external attributes from Jira and keeps them until the project is closed.
Example: Fetch the URL, status, and release versions information from the Jira Story work items exported from ReqView.
-
In the Document Attributes dialog, define ReqView custom attributes jiraUrl, jiraStatus and jiraFixVersions to store information fetched from Jira as follows:
{"jiraUrl": {"name": "Jira URL","type": "xhtml","readOnly": true},"jiraStatus": {"name": "Jira Status","type": "string","external": true,"readOnly": true},"jiraFixVersions": {"name": "Fix Versions","type": "string","external": true,"readOnly": true}}- All attributes are defined as read-only because their source of truth is in Jira and users should not edit their values.
- The attribute jiraUrl is defined as not external because we need to persist its values in the project so that other users can display its values and navigate to Jira without after opening the project.
- The attributes jiraStatus and jiraFixVersions are defined as external because we do not want to store them within the project. To display their values after opening the project, users need to update their values from Jira.
-
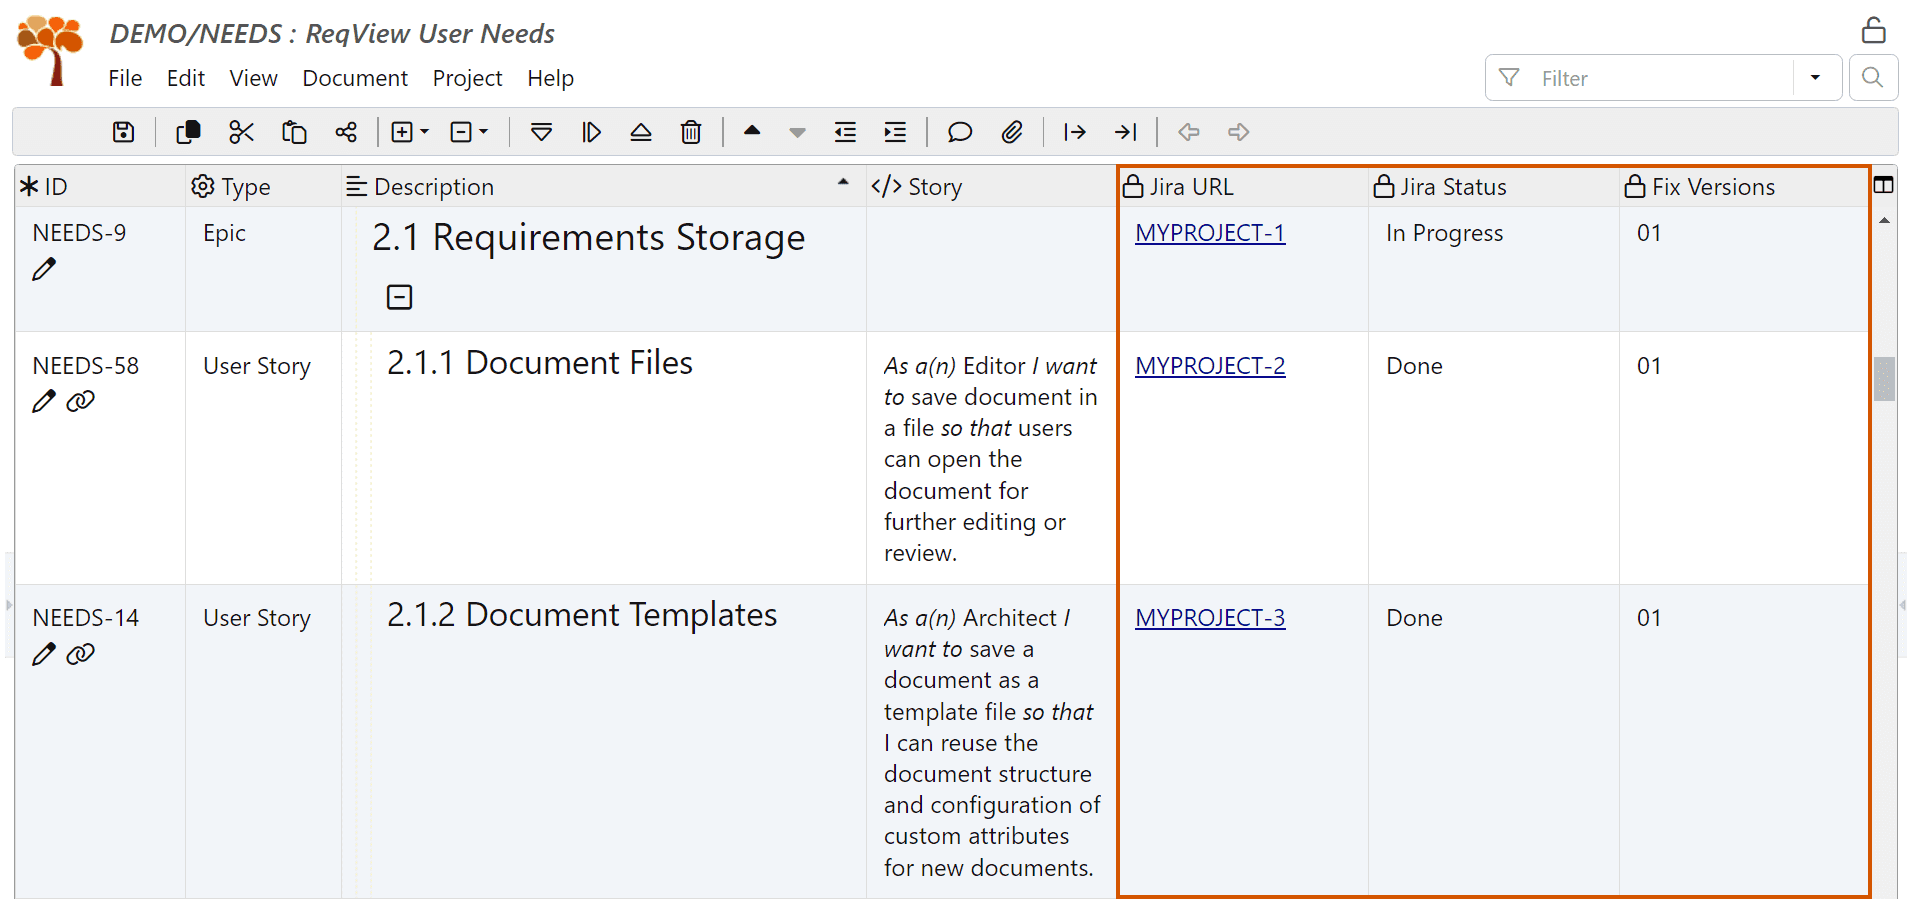
Display columns Jira URL, Jira Status and Fix Versions in the table view.
-
In the Configure Synchronization With Jira dialog, set the configuration property
reqviewAttributesas follows:{"reqviewAttributes": {"jiraUrl": "$URL","jiraStatus": "Status","jiraFixVersions": "Fix versions"}} -
Update the document from Jira:
![Jira Custom Attributes in ReqView Jira Custom Attributes in ReqView]()
Manage Tests in Jira
You can describe test cases in ReqView documents and link them to requirements by verification links conveniently. However, you can also choose to manage test cases and capture their execution results using a 3rd party Jira test management plugin, for instance Xray or Zephyr.
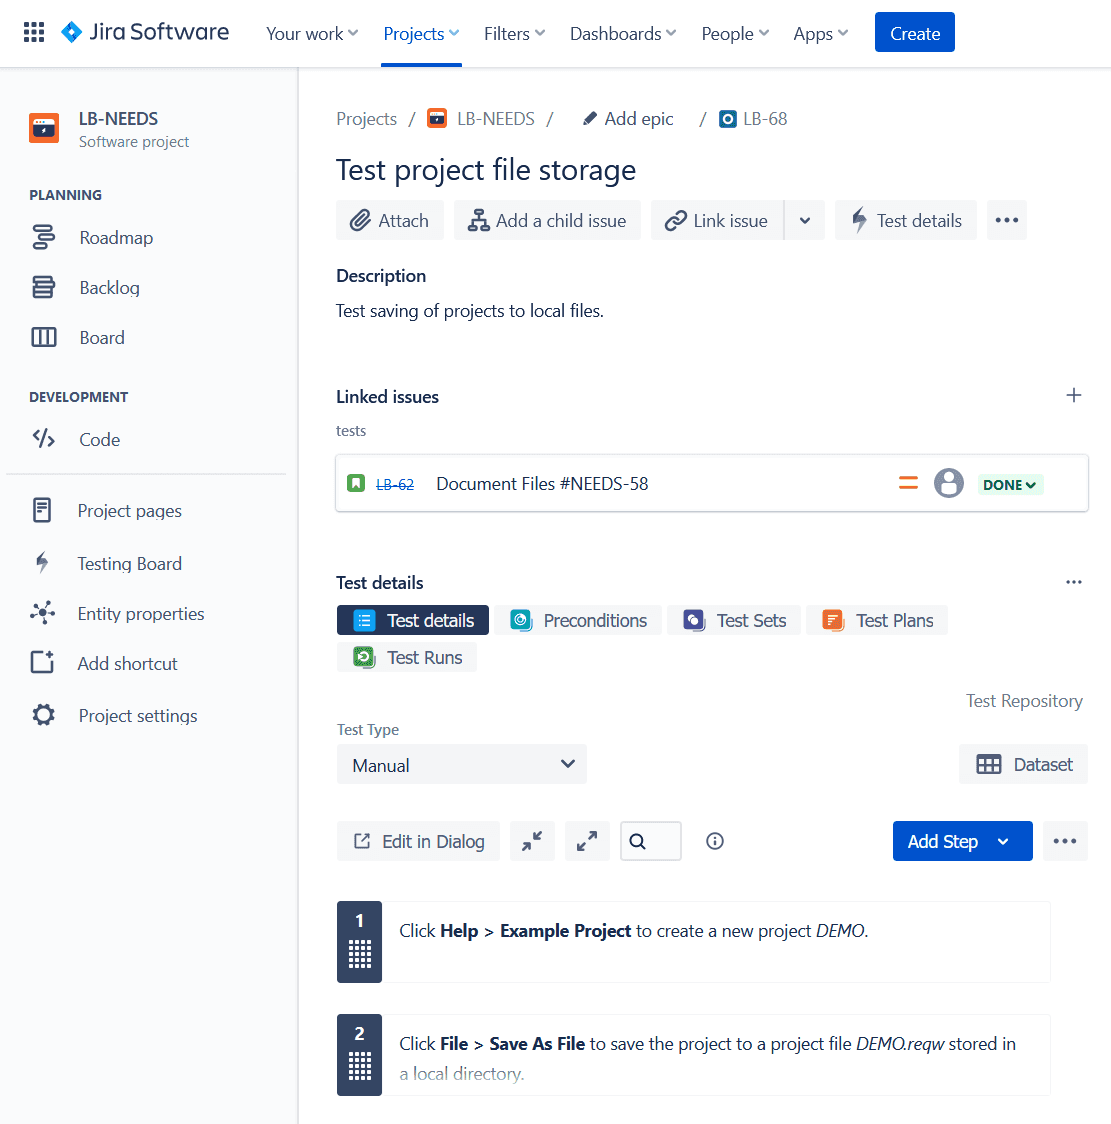
With these Jira plugins, you describe test cases as Jira work items of type Test providing information about tests steps, such as the action, test data, and expected results. Then, you link Test work items to Story work items to trace verified requirements. Finally, create test plans to schedule execution test cases, execute test plans, capture test results, and create defects describing found anomalies for each failed test.
Example: Manage tests in Jira using Xray plugin. See Xray documentation for more information how to install, configure and use Xray.
Test cases in Xray are described in Test Jira work items:
And, test coverage in Xray is displayed in Story Jira work items:
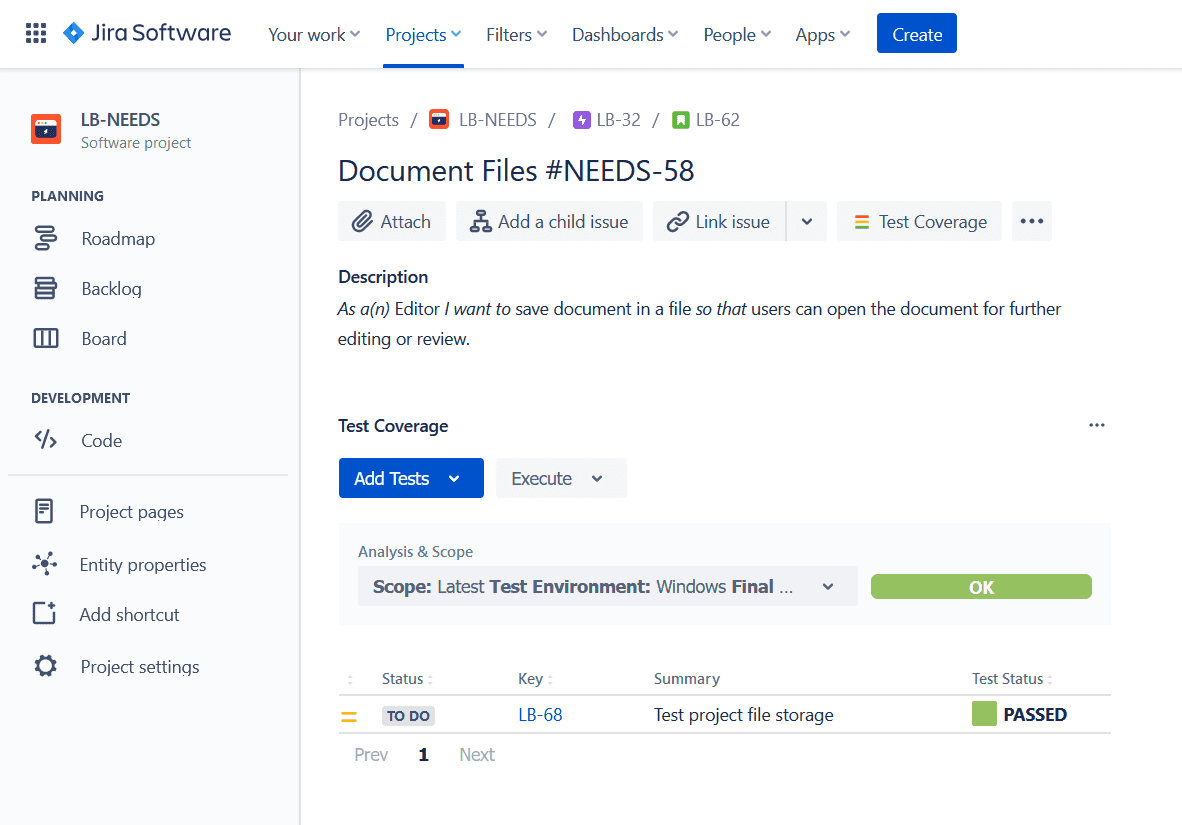
In ReqView, open the Document Attributes dialog and add new external read-only custom attribute to fetch URLs of linked Test Jira work items from the exported Story work items:
{ "jiraLinks": { "name": "Jira Links", "type": "xhtml", "external": true, "readOnly": true }}Then, open the Configure Synchronization With Jira dialog and map jiraLinks to URLs of linked Test work items as follows:
{ "reqviewAttributes": { "jiraLinks": "$LinkedIssues(Test)" }}Example Integration With Jira
You can try ReqView integration with Jira easily. We have configured the Example Project for exporting epics and users stories from the document NEEDS into your test Jira Cloud project.
Follow these steps:
- Download Example ReqView Project (reqview-demo-jira.reqw).
- Start ReqView and enable Jira integration, click Edit, select Preferences, and tick Integrate with Jira.
- Open the project file reqview-demo-jira.reqw in ReqView, open NEEDS document, open the Configure Synchronization With Jira dialog, and replace “mycompany” and “MYPROJECT” to match your test project at Jira Cloud.
- Enable the ReqView Connector for Jira plugin.
- Optionally, enable a test management Jira plugin.
- Export epics and user stories from the NEEDS document.
